ARHive WooCommerce Plugin Documentation
Introduction
Thank you for purchasing ARHive WooCommerce plugin. Before you get started, please be sure to always check out these documentation files. We outline all kinds of good information, and provide you with all the details you need know to use ARHive WooCommerce plugin.
If you are unable to find your answer here in the documentation, please contact us on our Support desk.
What is included in the price?
- ARHive WooCommerce Plugin
- Lifetime Updates
- Plugin Documentation
- Premium Support - To our support desk.
Thanks!
Ommune Team
Plugin Installation via WordPress
After the purchase you will be able to download the plugin .zip file.
Once downloaded, you should see arhive-woocommerce.zip (zip file name can be changed from version to version).
Please, follow the steps below to install ARHive WooCommerce Plugin.
Step 1 - Login to your WordPress Dashboard.
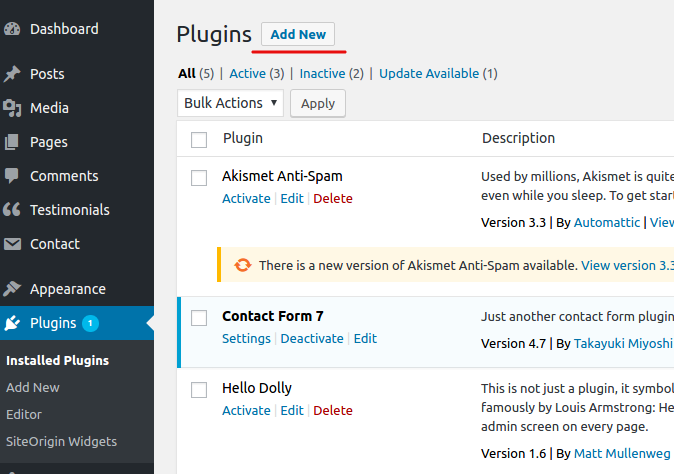
Step 2 - Go to Plugins. Click Add new button, located at the top of the screen. (see screenshots below)
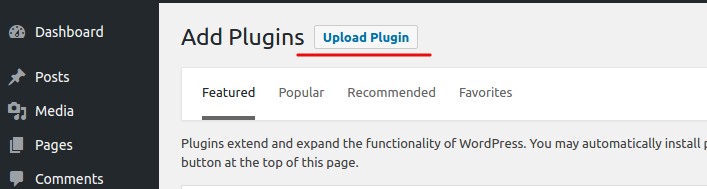
Step 3 - Click on Upload Plugin button at the top of the screen.
Step 4 - Choose arhive-woocommerce.zip.
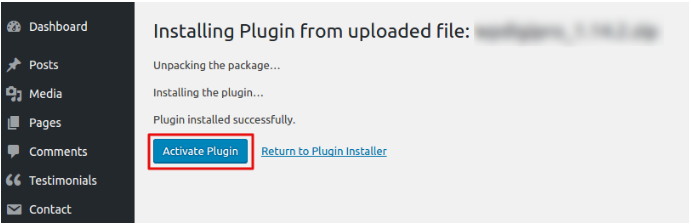
Step 5 - Wait while the plugin is uploaded and installed , when done Activate the ARHive WooCommerce plugin.
Step 6 - Congratulations! you are ready to use ARHive WooCommerce plugin.
Common Plugin Installation Problems
“Are you sure you want to do this?”
If you get the “Are you sure you want to do this” message when installing arhive-woocommerce.zip file via WordPress, it means you have an upload file size limit. Install the plugin via FTP if this happens, or ask your hosting company to increase the limit.
Missing stylesheet file
If you get an error saying that the stylesheet is missing, then you have uploaded the wrong folder. Please check that you are uploading the arhive-woocommerce.zip within the Plugin Files folder.
Plugin Installation via FTP
If you are going to install the plugin using FTP, you will need an FTP Client, such as FileZilla.
After the purchase you will be able to download the plugin .zip file.
Once downloaded, you should see arhive-woocommerce.zip (folder name can be changed from version to version).
Please, follow the steps below to install ARHive WooCommerce plugin via FTP:
Step 1 - Log into your hosting space (server) via FTP client.
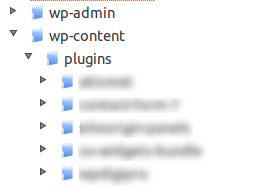
Step 2 - In extracted archive folder, find arhive-woocommerce folder
Step 3 - Upload the arhive-woocommerce folder to your server in path .../wp-content/plugins/
Step 4 - The uploaded path should be like this: .../wp-content/plugins/arhive-woocommerce/
Step 5 - Login to your WordPress Dashboard and go to Plugins and activate the ARHive WooCommerce Plugin. (see screenshots below)
Step 6 - Congratulation you are ready to use ARHive WooCommerce plugin.
Common Plugin Installation Problems
“Are you sure you want to do this?”
If you get the “Are you sure you want to do this” message when installing arhive-woocommerce.zip file via WordPress, it means you have an upload file size limit. Install the plugin via FTP if this happens, or ask your hosting company to increase the limit.
Missing stylesheet file
If you get an error saying that the stylesheet is missing, then you have uploaded the wrong folder. Please check that you are uploading the arhive-woocommerce.zip within the Plugin Files folder.
Additional Links
Configure Autoresponders
After installing the plugin the first step to take will be configuring your Autoresponder.
Go to your WordPress Dashboard > ARHive WC > AR Settings in your wp-admin menu, as shown in the below screenshot and then hover on your Autoresponder, you will see ADD or CHANGE CONFIGURATION link as shown below. You need to add your API credentials in the popup that appears when you click on that link.
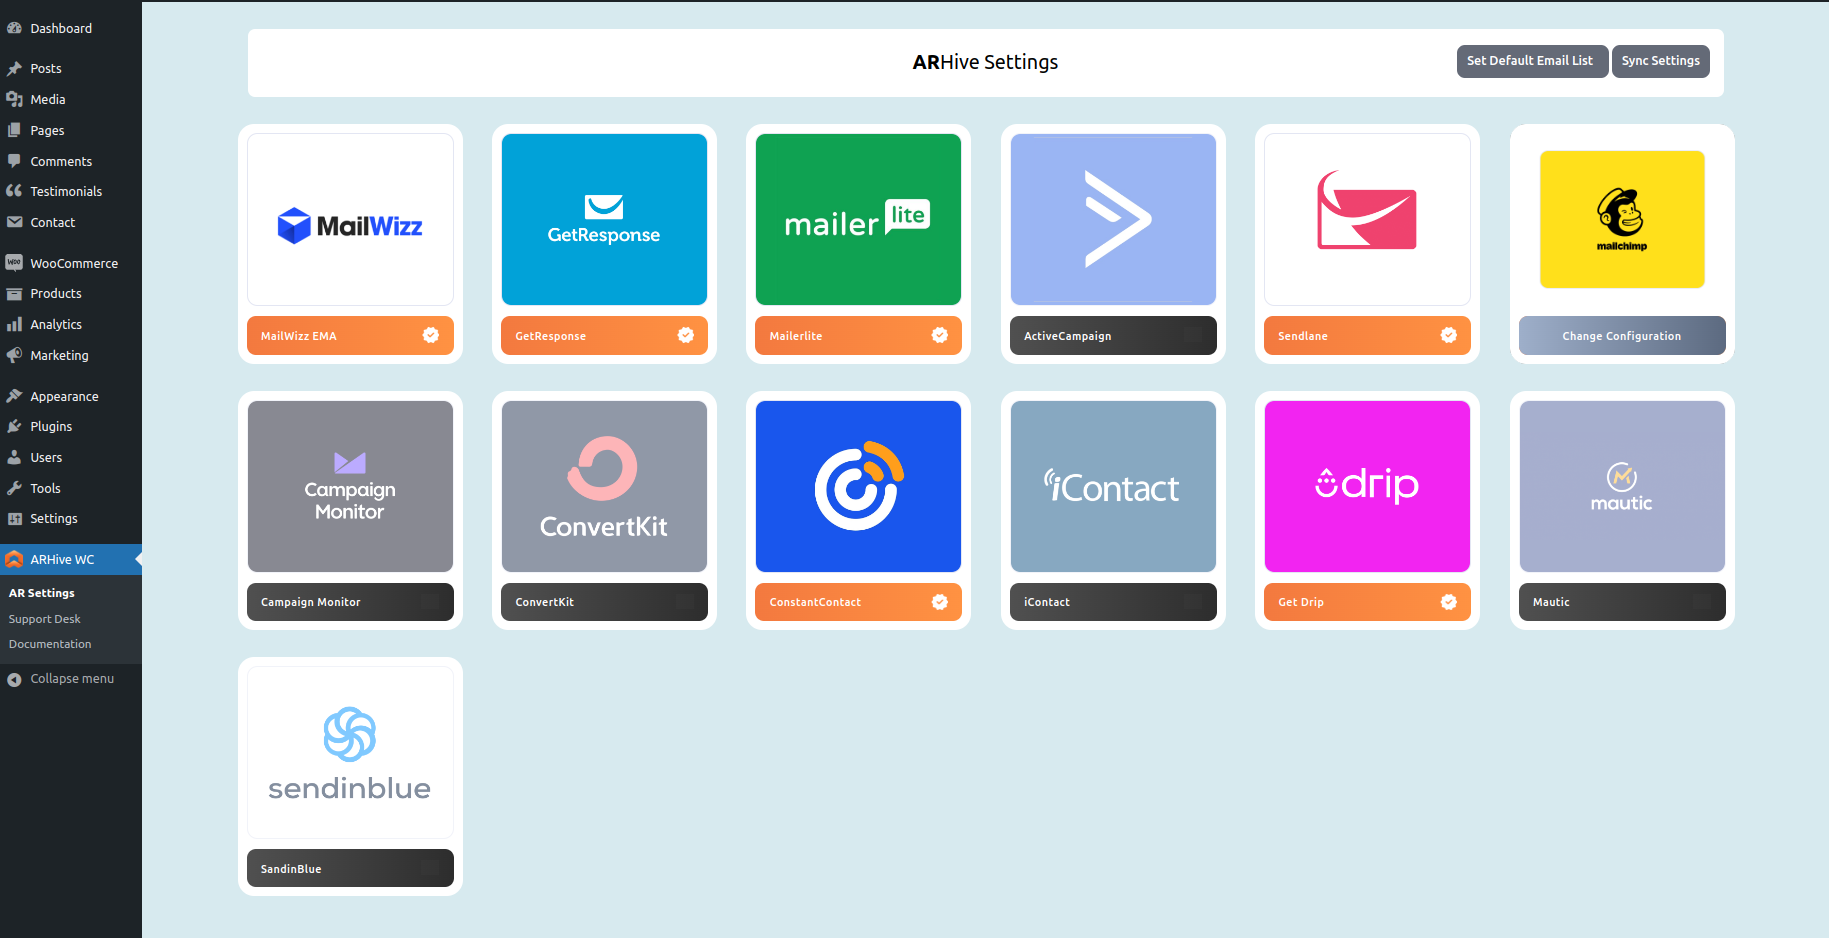
Set Default Email List
In this page, you will see a button at the top Set Default Email List, if you click here you will be able to select a default list in a particular Autoresponder.
If you forget to set any Autoresponder is any of your WooCommerce product or if you want to use just 1 list for all your WooCommerce product buyers then you can set that list/Autoresponder in this setting.

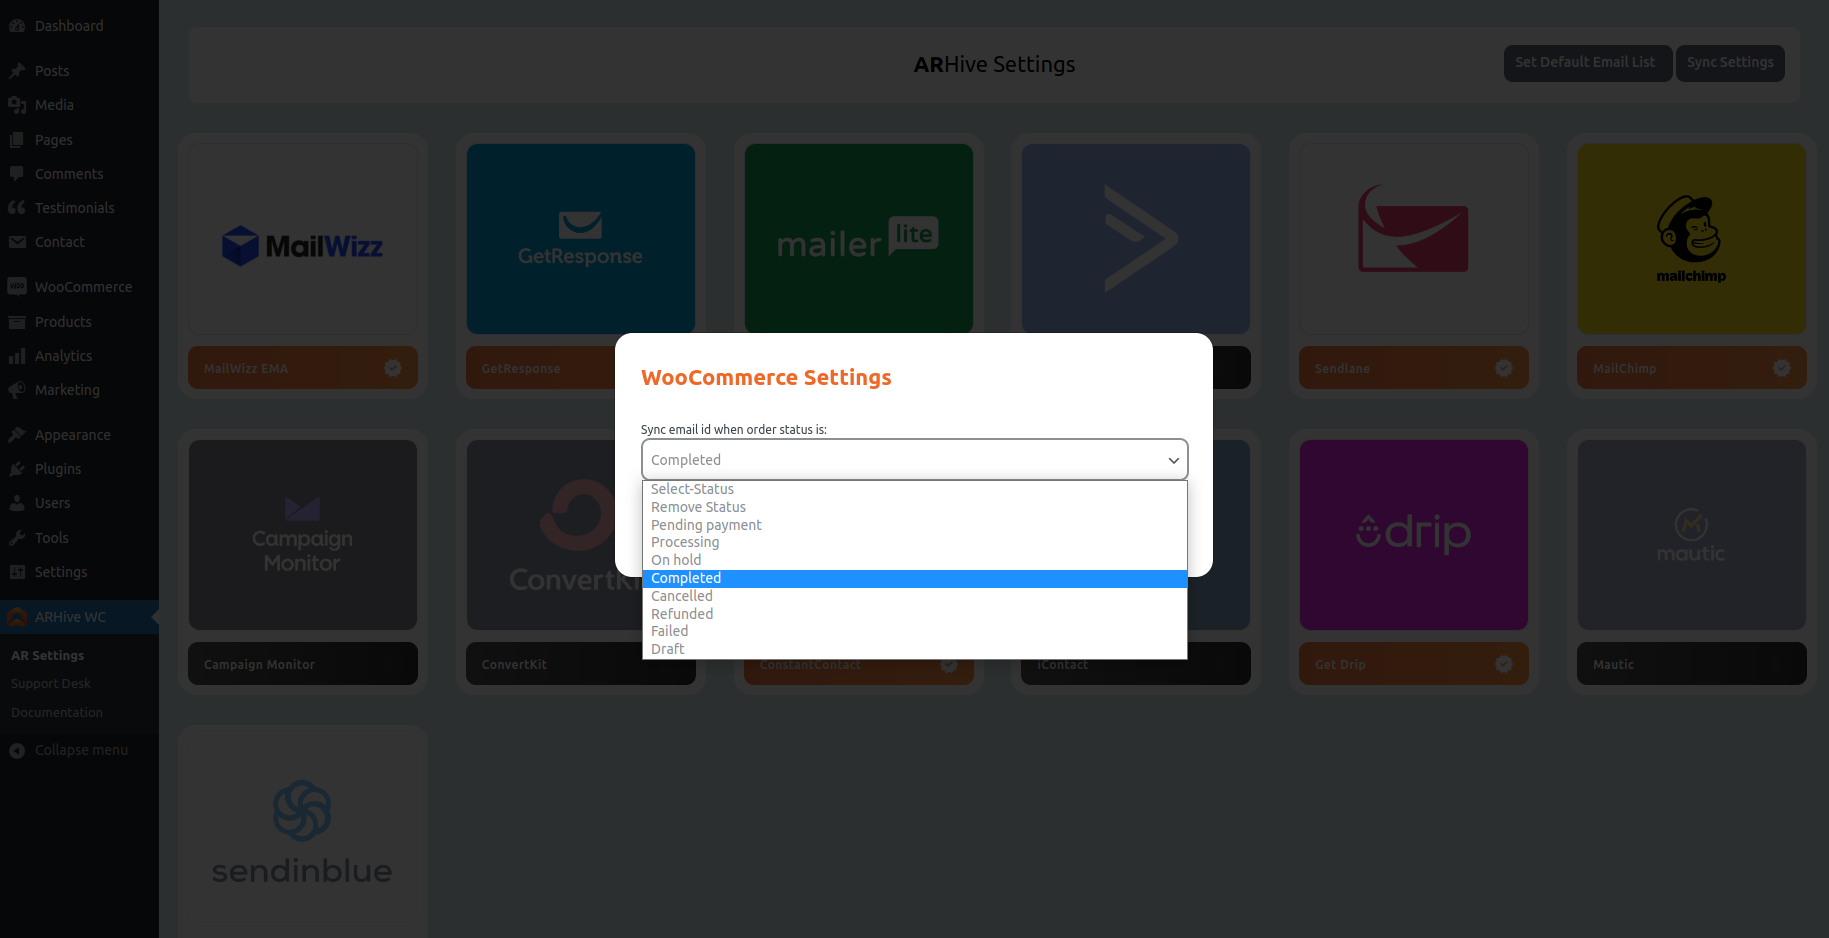
Sync Settings
In this page, you will see a button at the top Sync Settings, if you click here you will be able to select a condition in your product that when exactly (at what order status) the email will be added to the Autoresponder.
For e.g if you select Completed from the drop down, then when the order status is marked as Completed by the system then only the email ID of the buyer will get added to the Autoresponder.
Configure WooCommerce Product Page
After configuring your Autoresponder in the above step, now you need to go to product page of your WooCommerce product for which you need to configure the settings. Dashboard > Products > All Products in your wp-admin menu, and then click on EDIT link of the product where you want to associate your Autoresponder , you will see ARHive WooCommerce Settings dropdown menu as shown below. There you can first select your Autoresponder and then you will choose your list from Select A List dropdown as shown below:
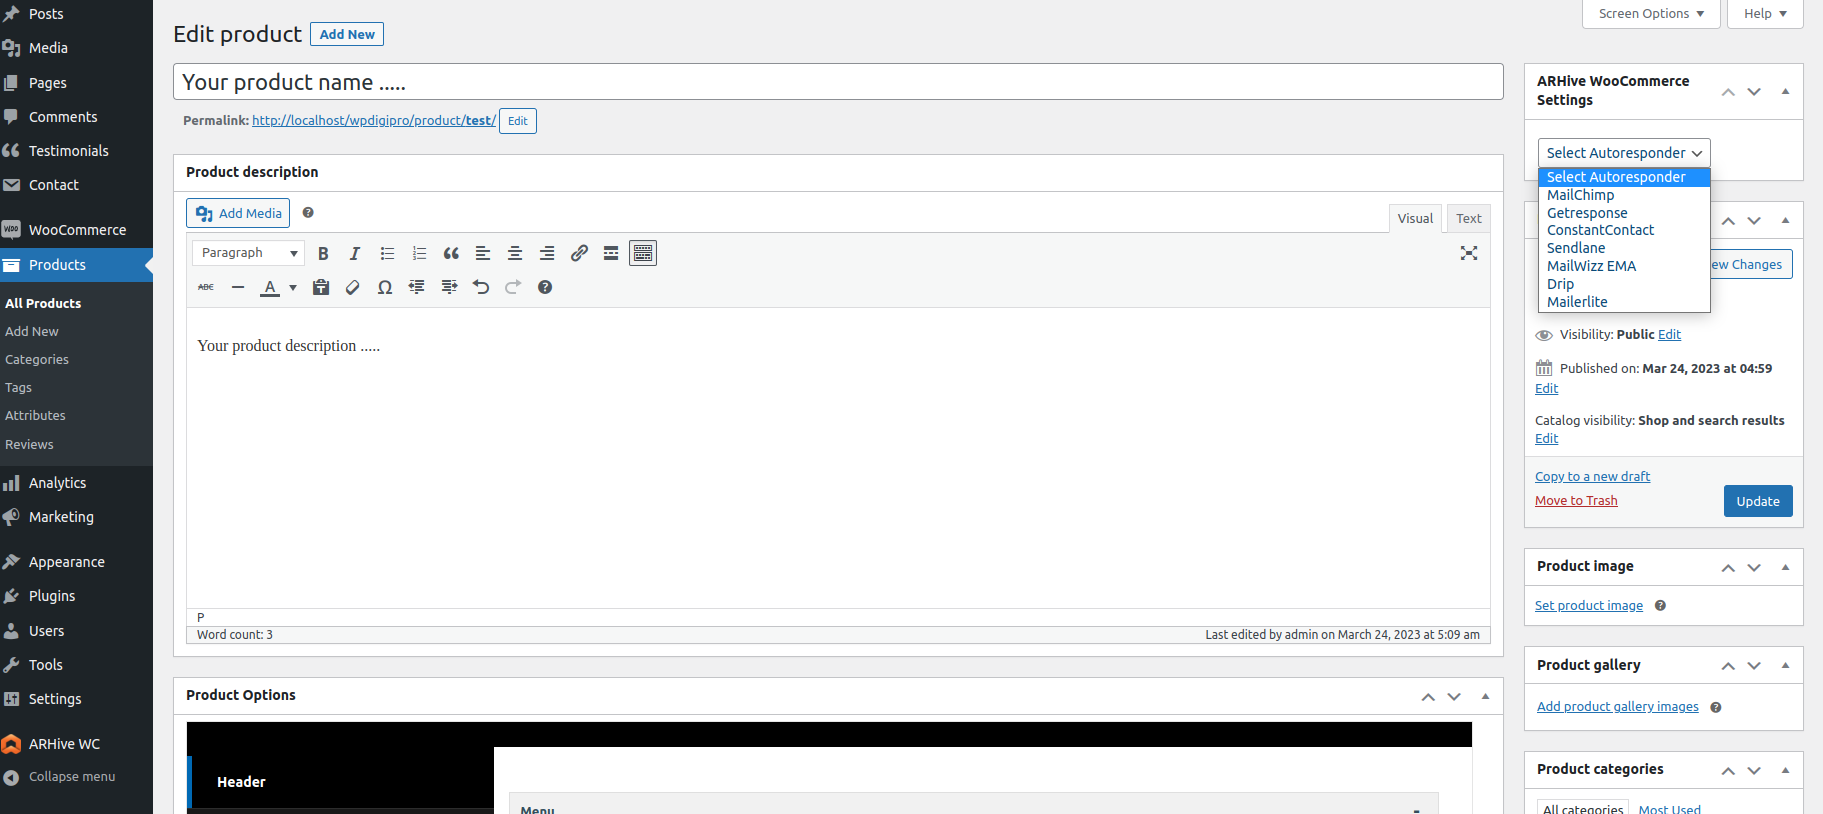
Note: All the Autoresponders that you have configured in Dashboard > ARHive WooCommerce menu will be visible here.
As soon as someone buys this product, his/her email ID will be added to the above selected Autoresponder.
MailerLite
If you don't have an account, you can create your MailerLite account using this link.
To create the API key, just go here: : https://app.mailerlite.com/integrations/api/. You will see a box that will have your API Key. Just click on "Copy" or "Regenerate" button. That's it.
Please check the below screenshot for more clarity:

ActiveCampaign
If you don't have an account, you can create your ActiveCampaign account using this link.
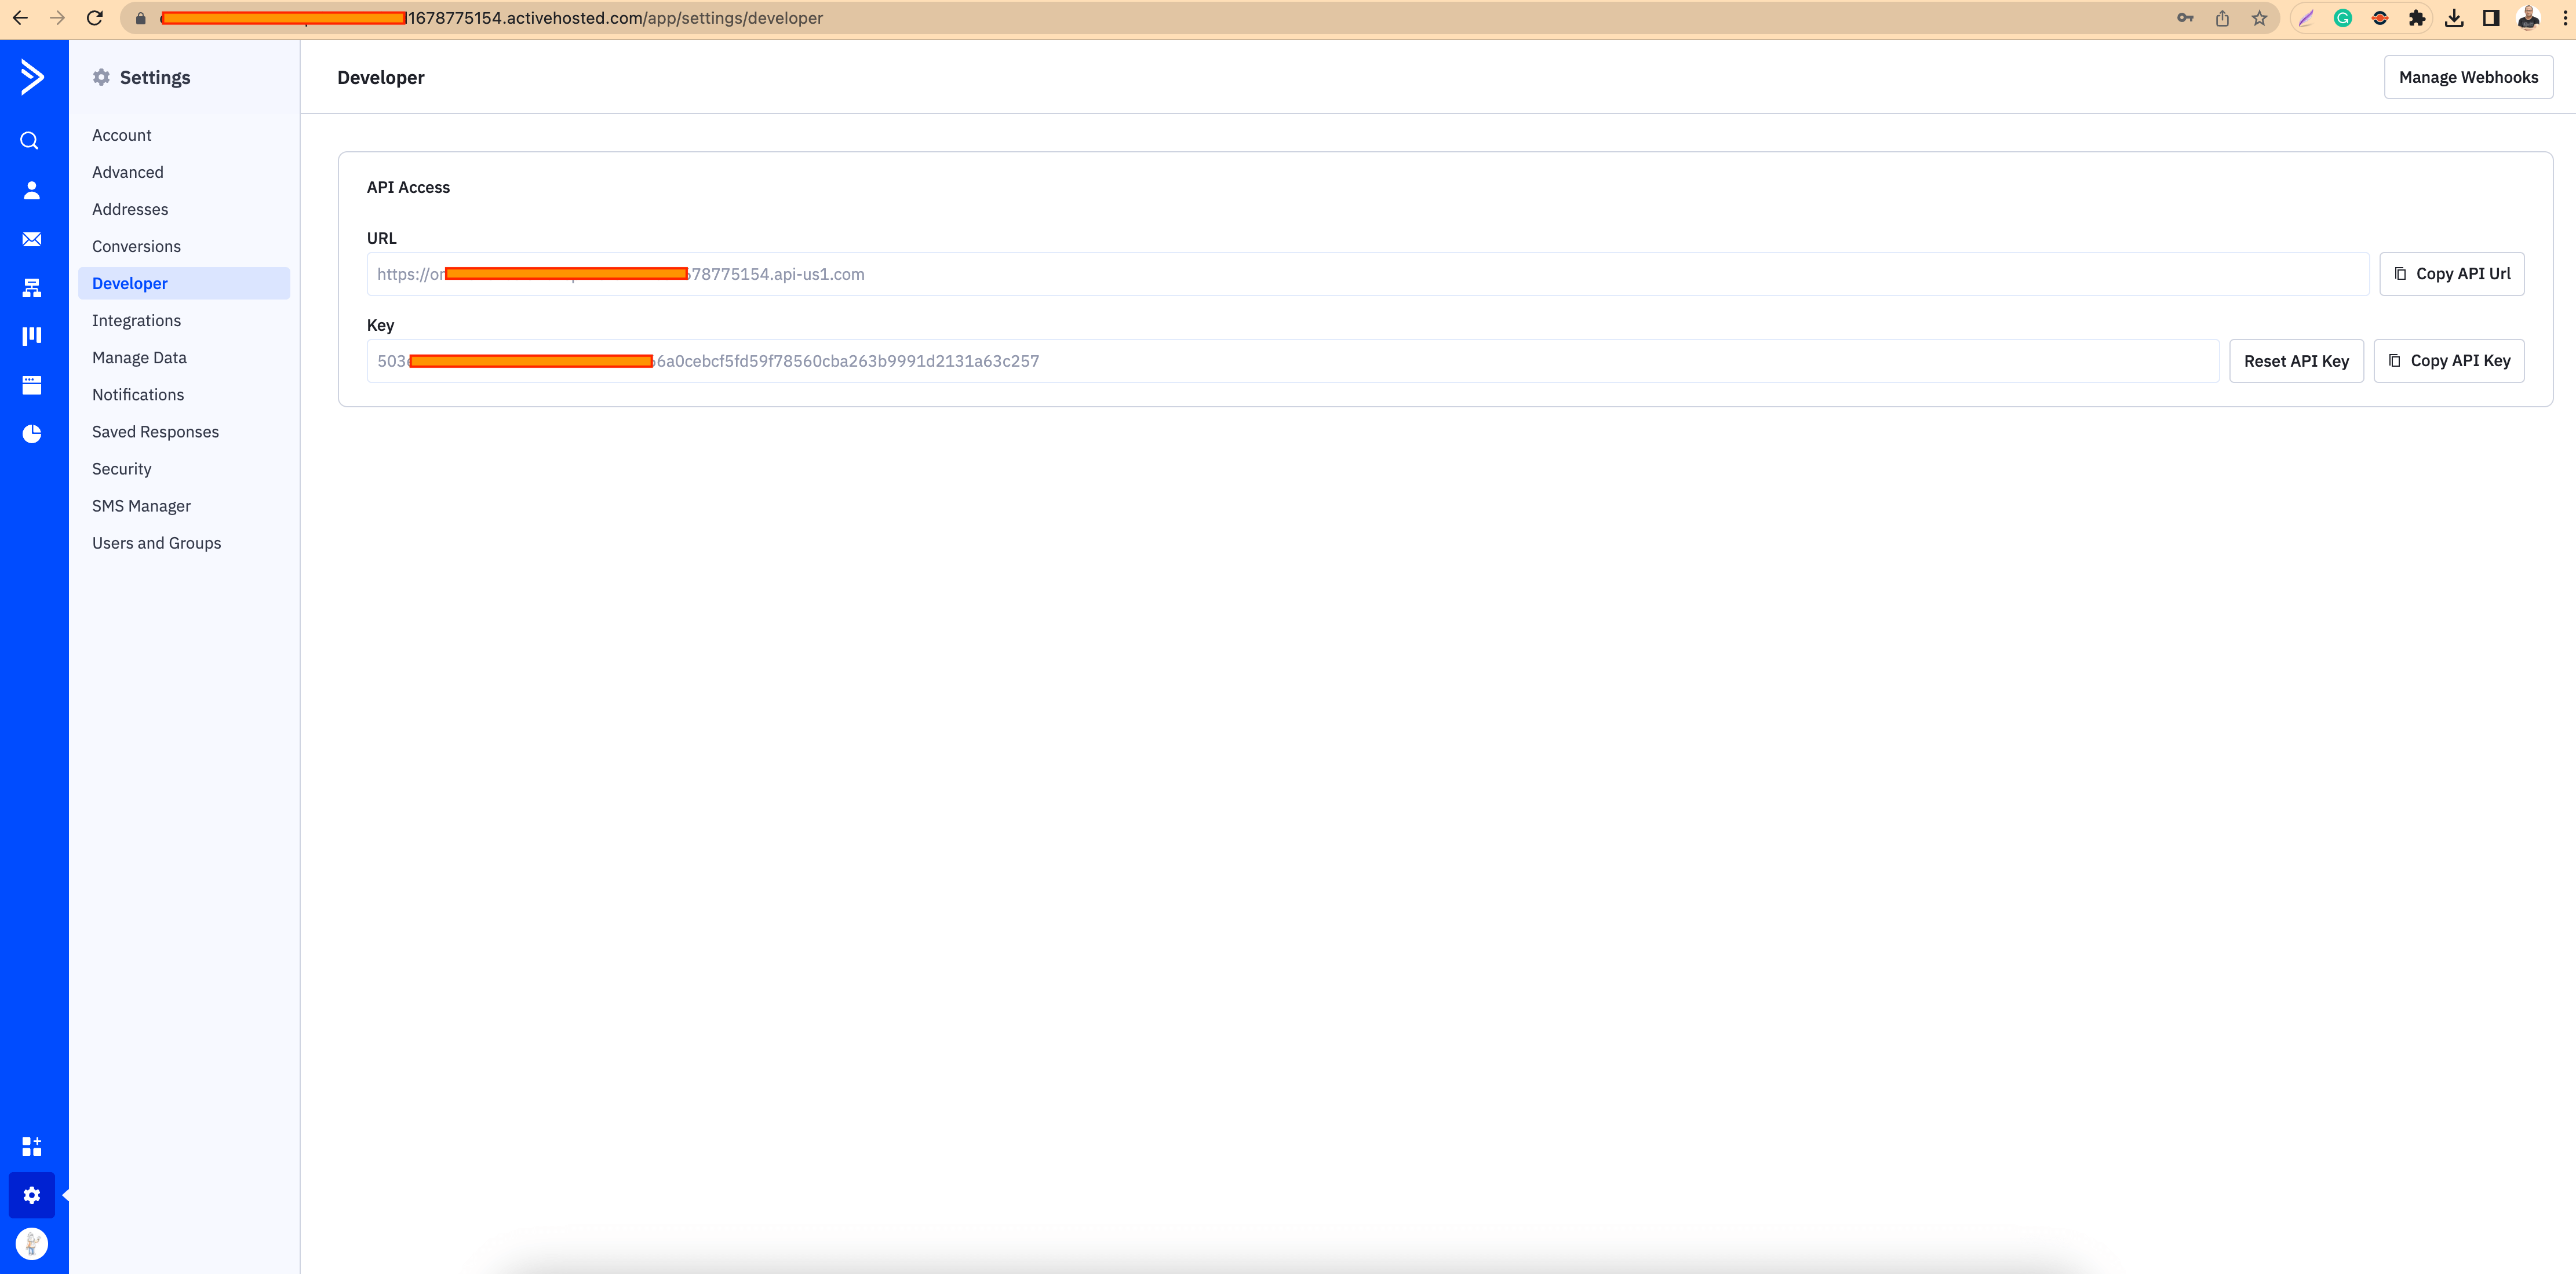
You will get a seperate login URL to your dashboard as: https://yourcustomname.activehosted.com. You need to login there and then you need to go to https://yourcustomname.activehosted.com/app/settings/developer to get your "URL" and "Key" for API Access.
Please check the below screenshot for more clarity:
Sendlane
If you don't have an account, you can create your Sendlane account.
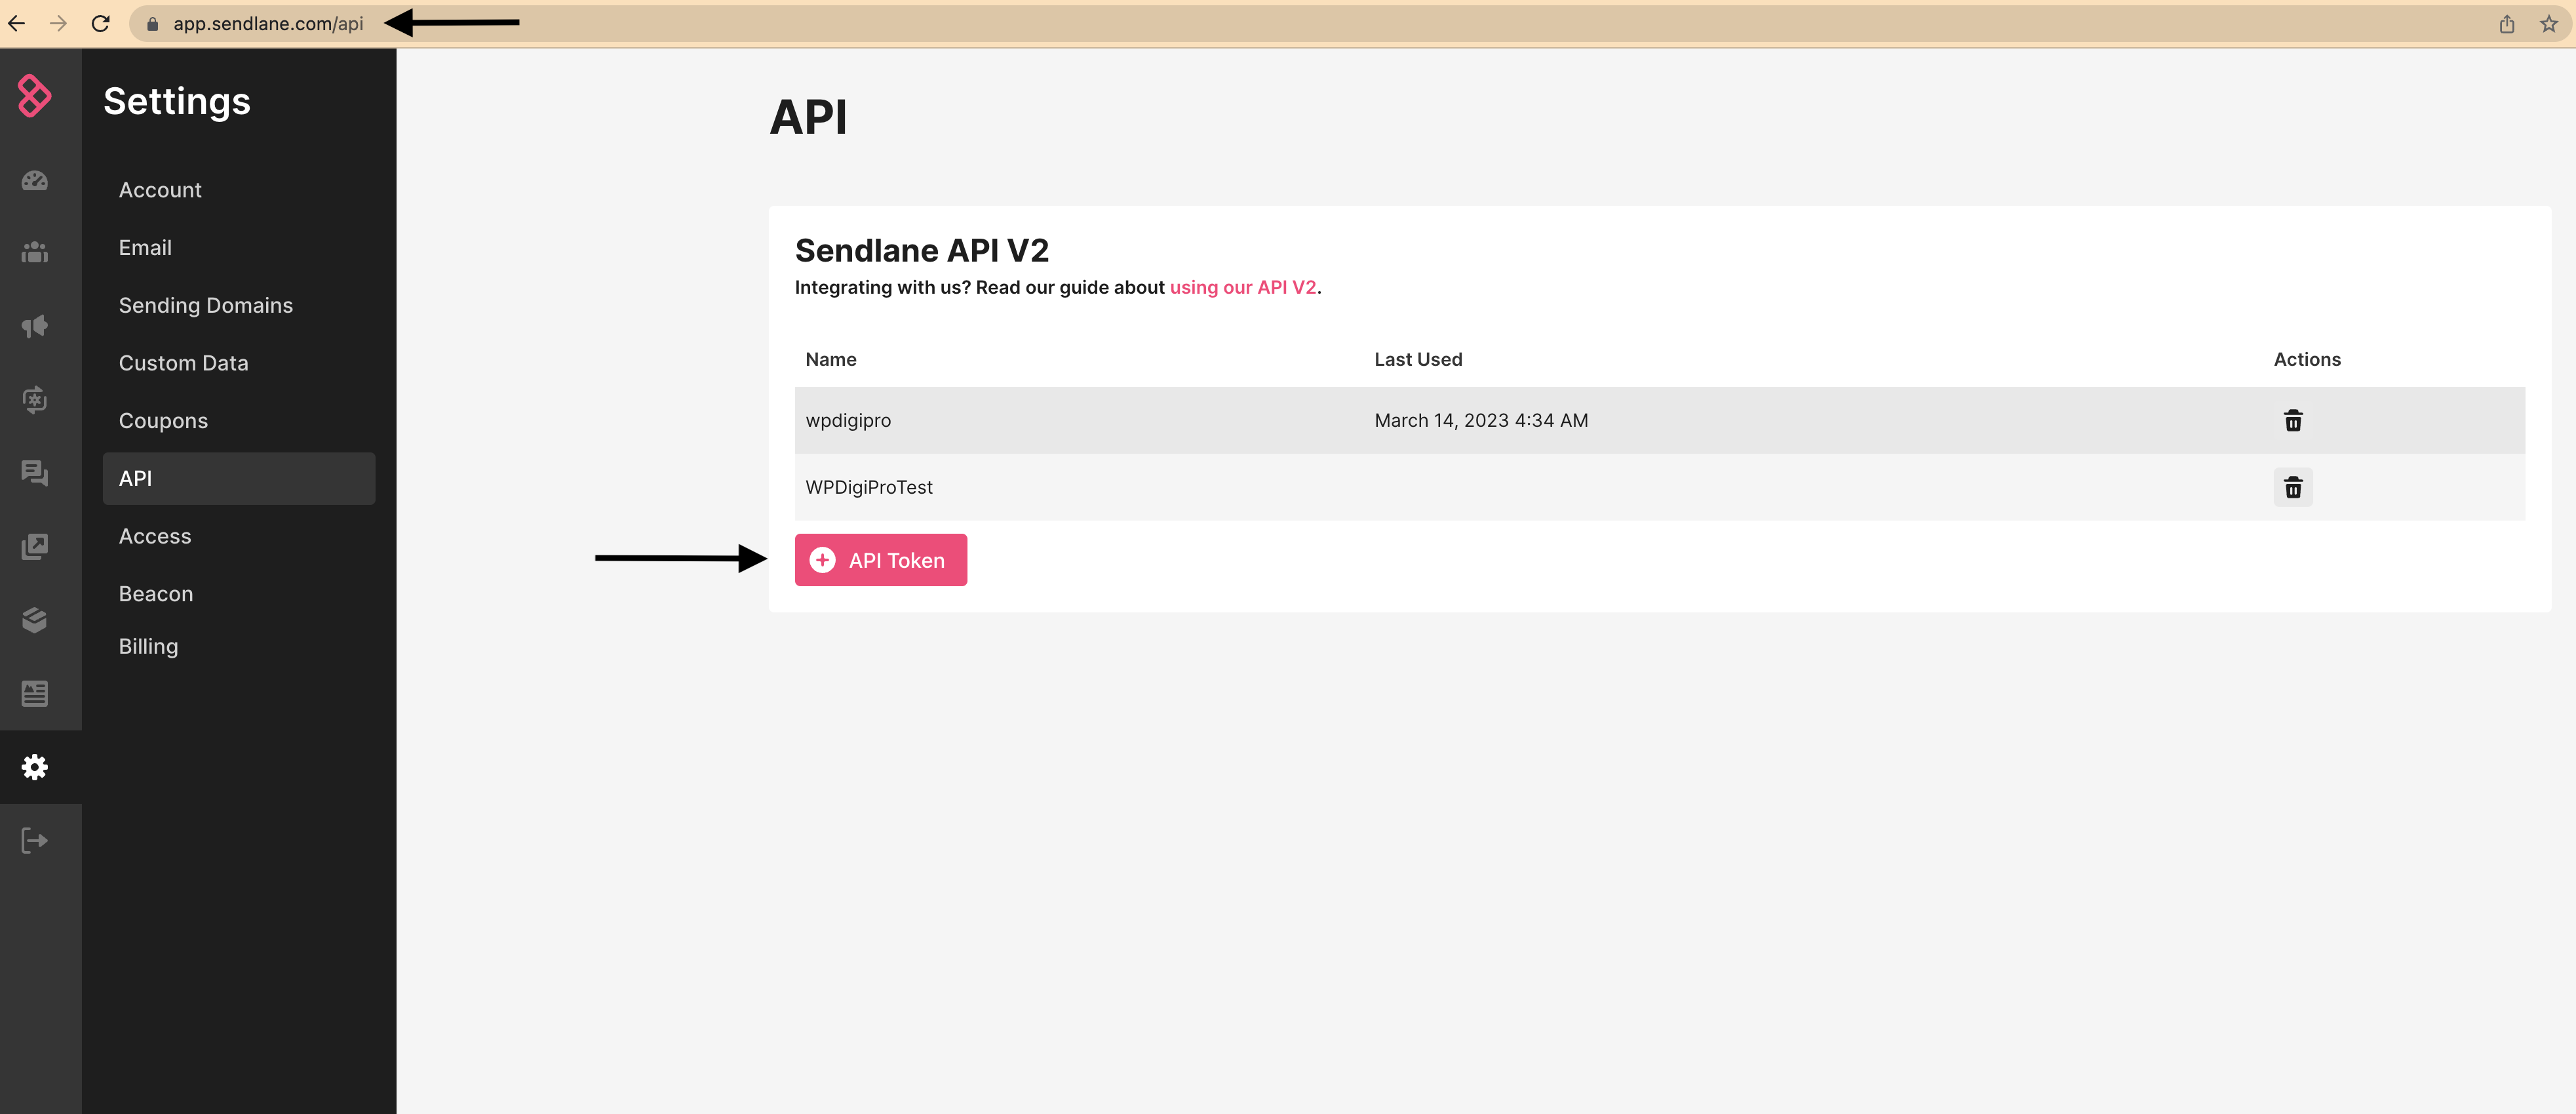
To create the API key (Sendlane API V2), just go here: : https://app.sendlane.com/api and click on "API Token" button. That's it.
Please check the below screenshot for more clarity:
Mailchimp
If you don't have an account, you can create your Mailchimp account.
To generate an API key, follow these steps.
1. Navigate to the API Keys section of your account.
2. Click Create New Key.
3. Name your key descriptively, so you know what application uses that key. Keep in mind that you’ll see only this name and the first 4 digits on your list of API keys after the key is generated.
4. Click Generate Key.
5. Once you generate your key, click Copy Key to Clipboard. Save your key someplace secure; you won’t be able to see or copy it again. If you lose this key, you’ll need to generate a new key and update any integration that uses it..
6. Click Done.
Getresponse
If you don't have an account, you can create your Getresponse account using this link.
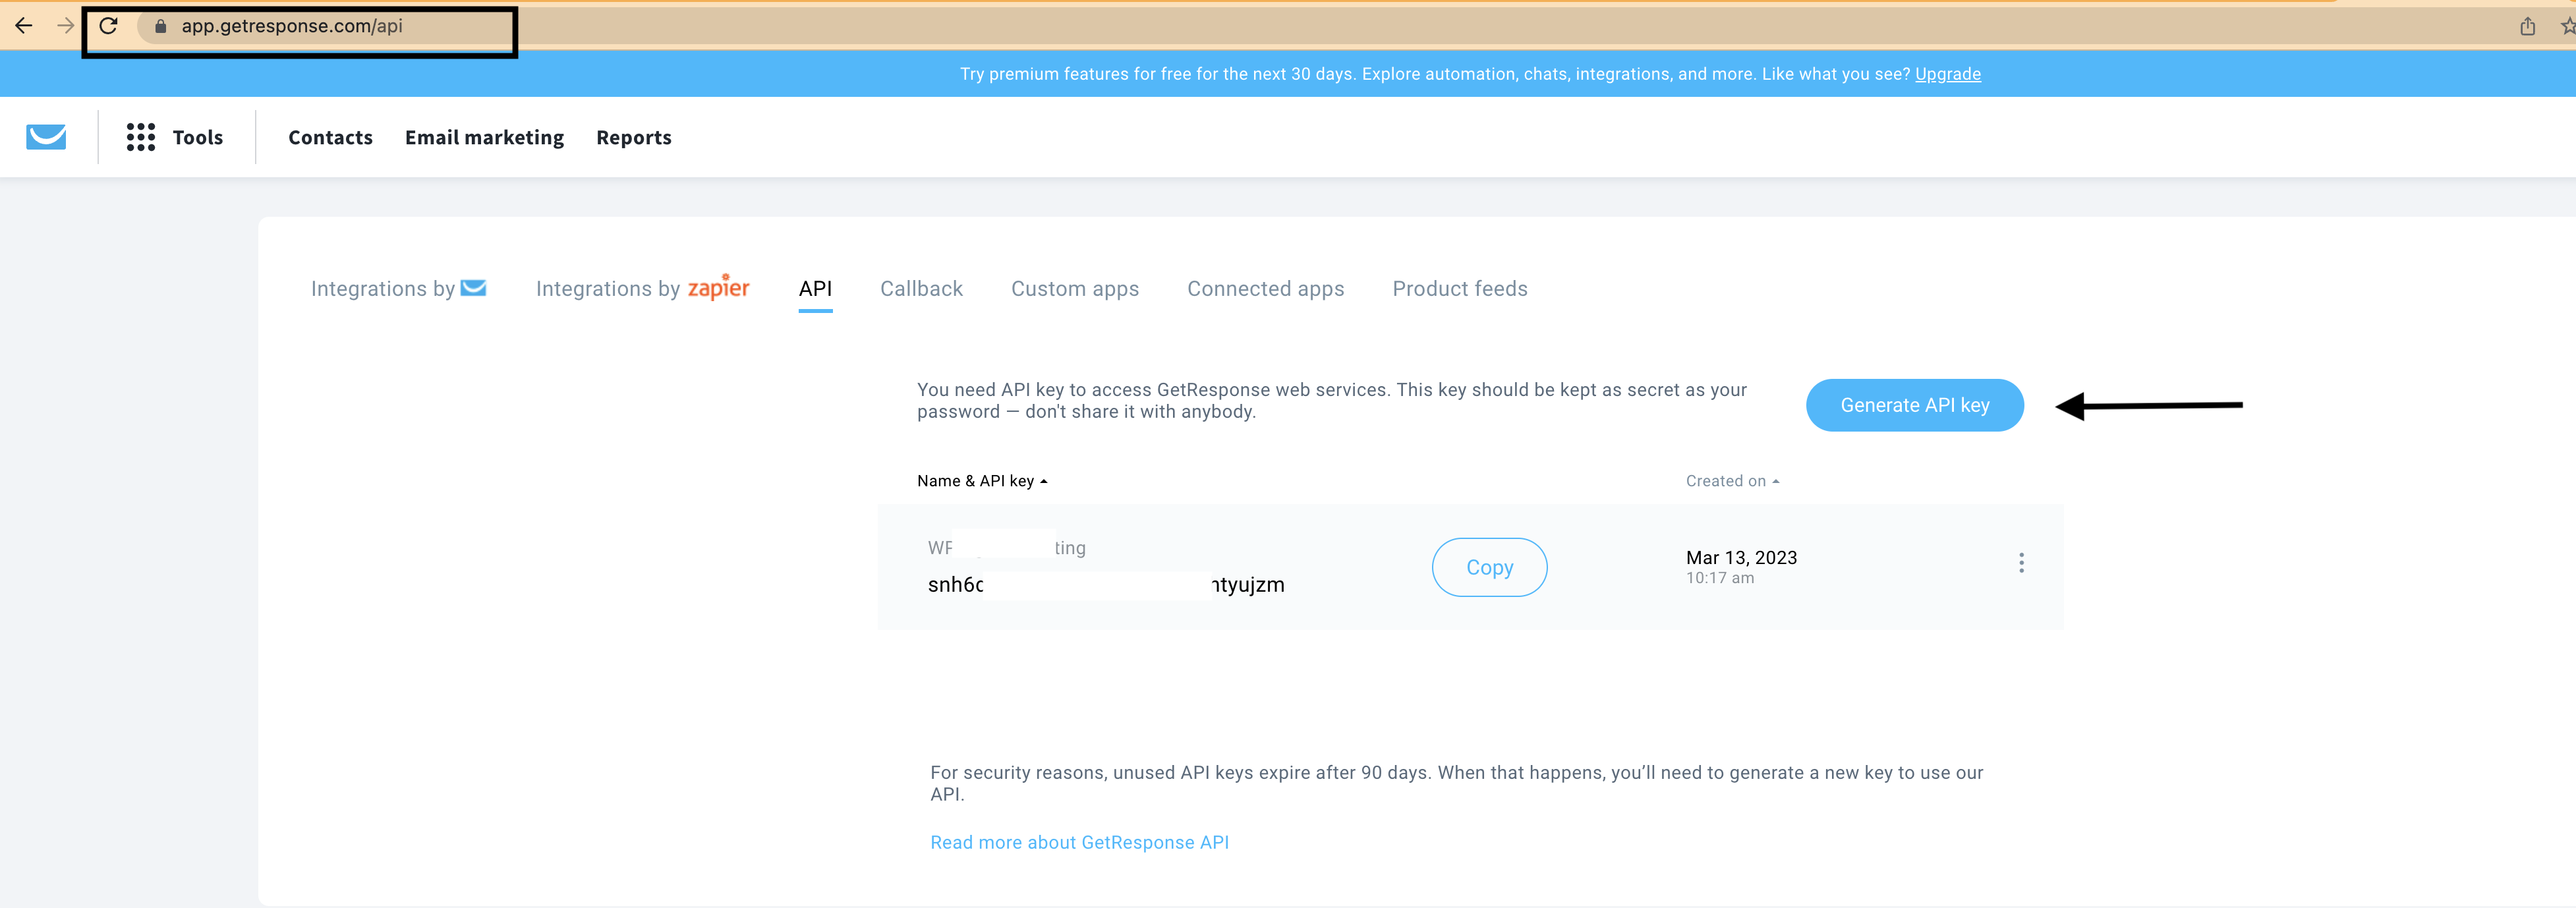
To create the API key, just go here: : https://app.getresponse.com/api and click on "Generate API Key" button. That's it.
Please check the below screenshot for more clarity:
Campaign Monitor
If you don't have an account, you can create your Campaign Monitor account using this link.
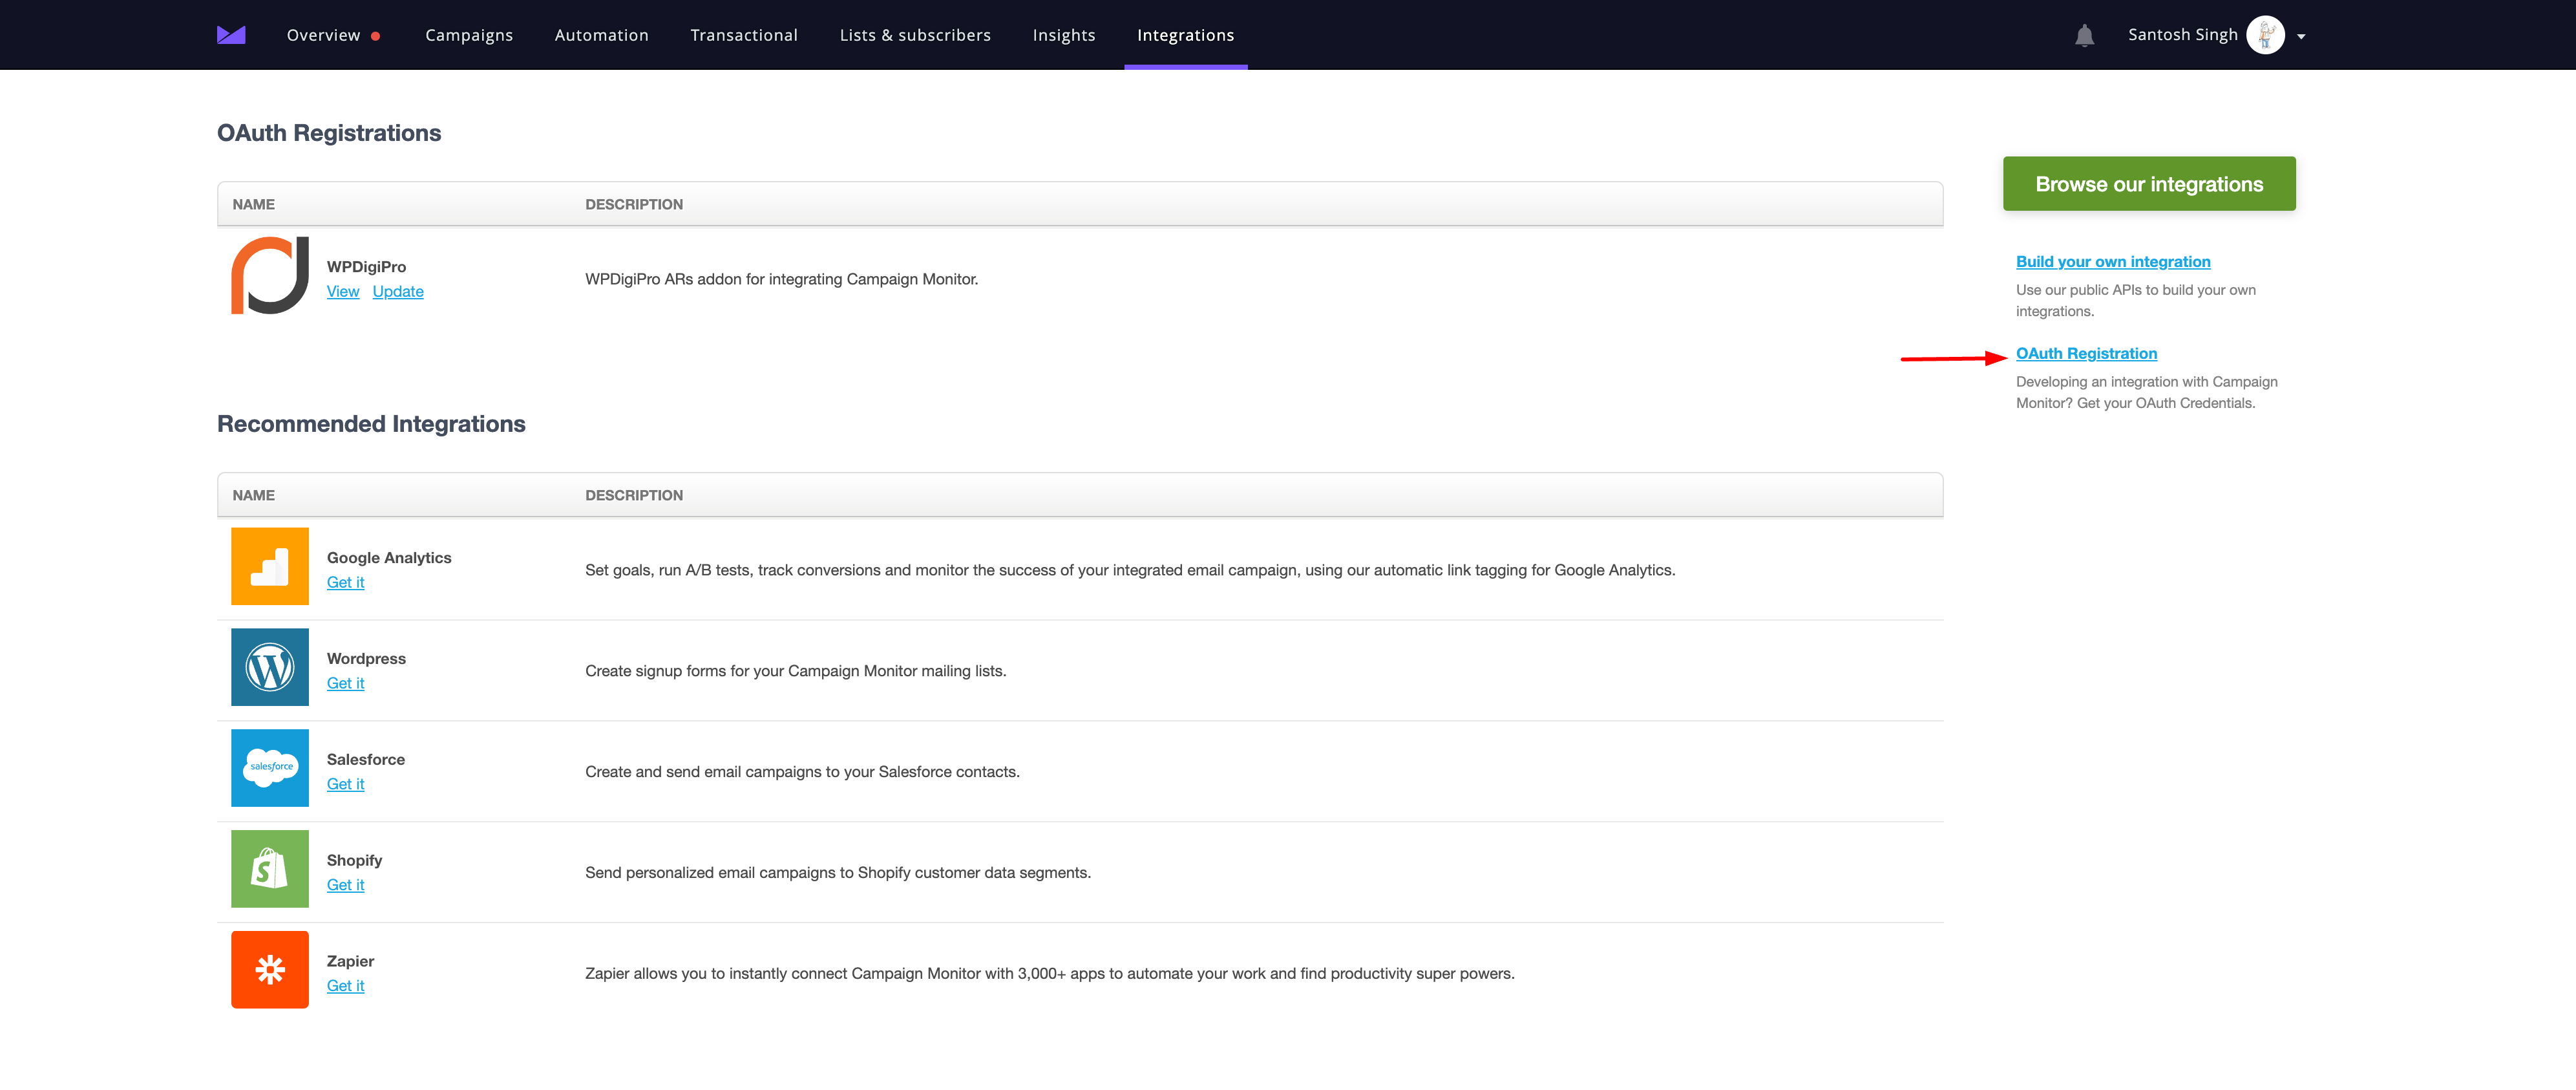
You will get a seperate login URL to your dashboard as: https://yourcustomname.createsend.com. You need to login there and then you need to go to https://yourcustomname.createsend.com/integrations/#/ or go to right hand side of the page where your name is appearing and then click on "Integrations" link in the menu as shown below:
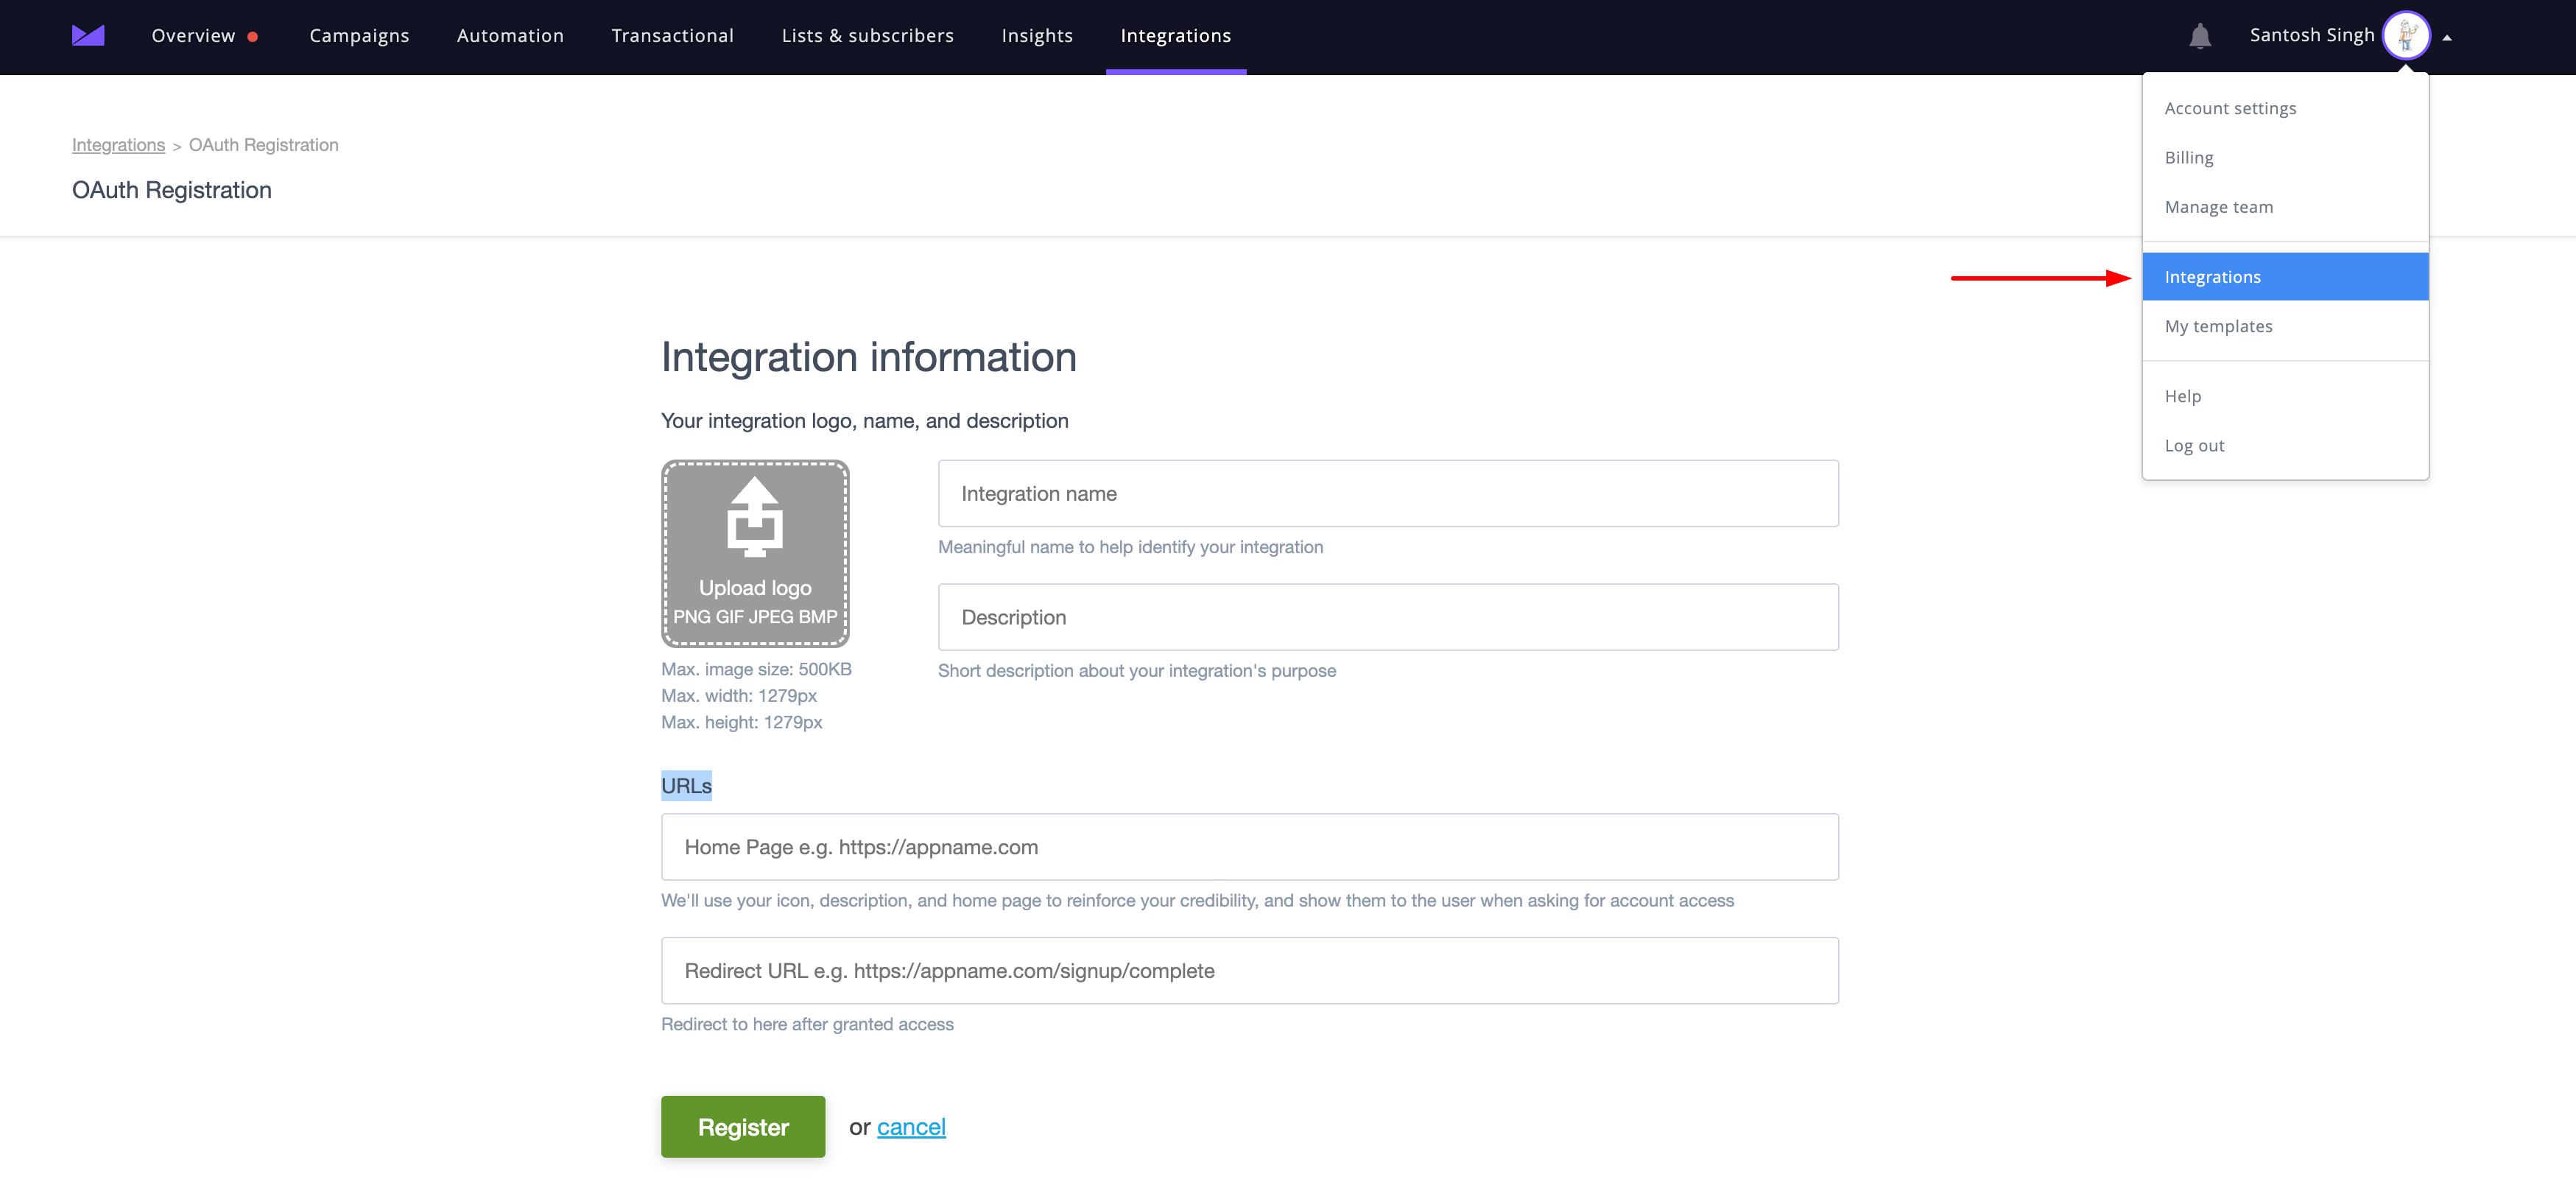
Then you need to click on "OAuth Registration" link in the right hand side as shown below:
Fill the form and just mention your domain name for URLs section as shown below:
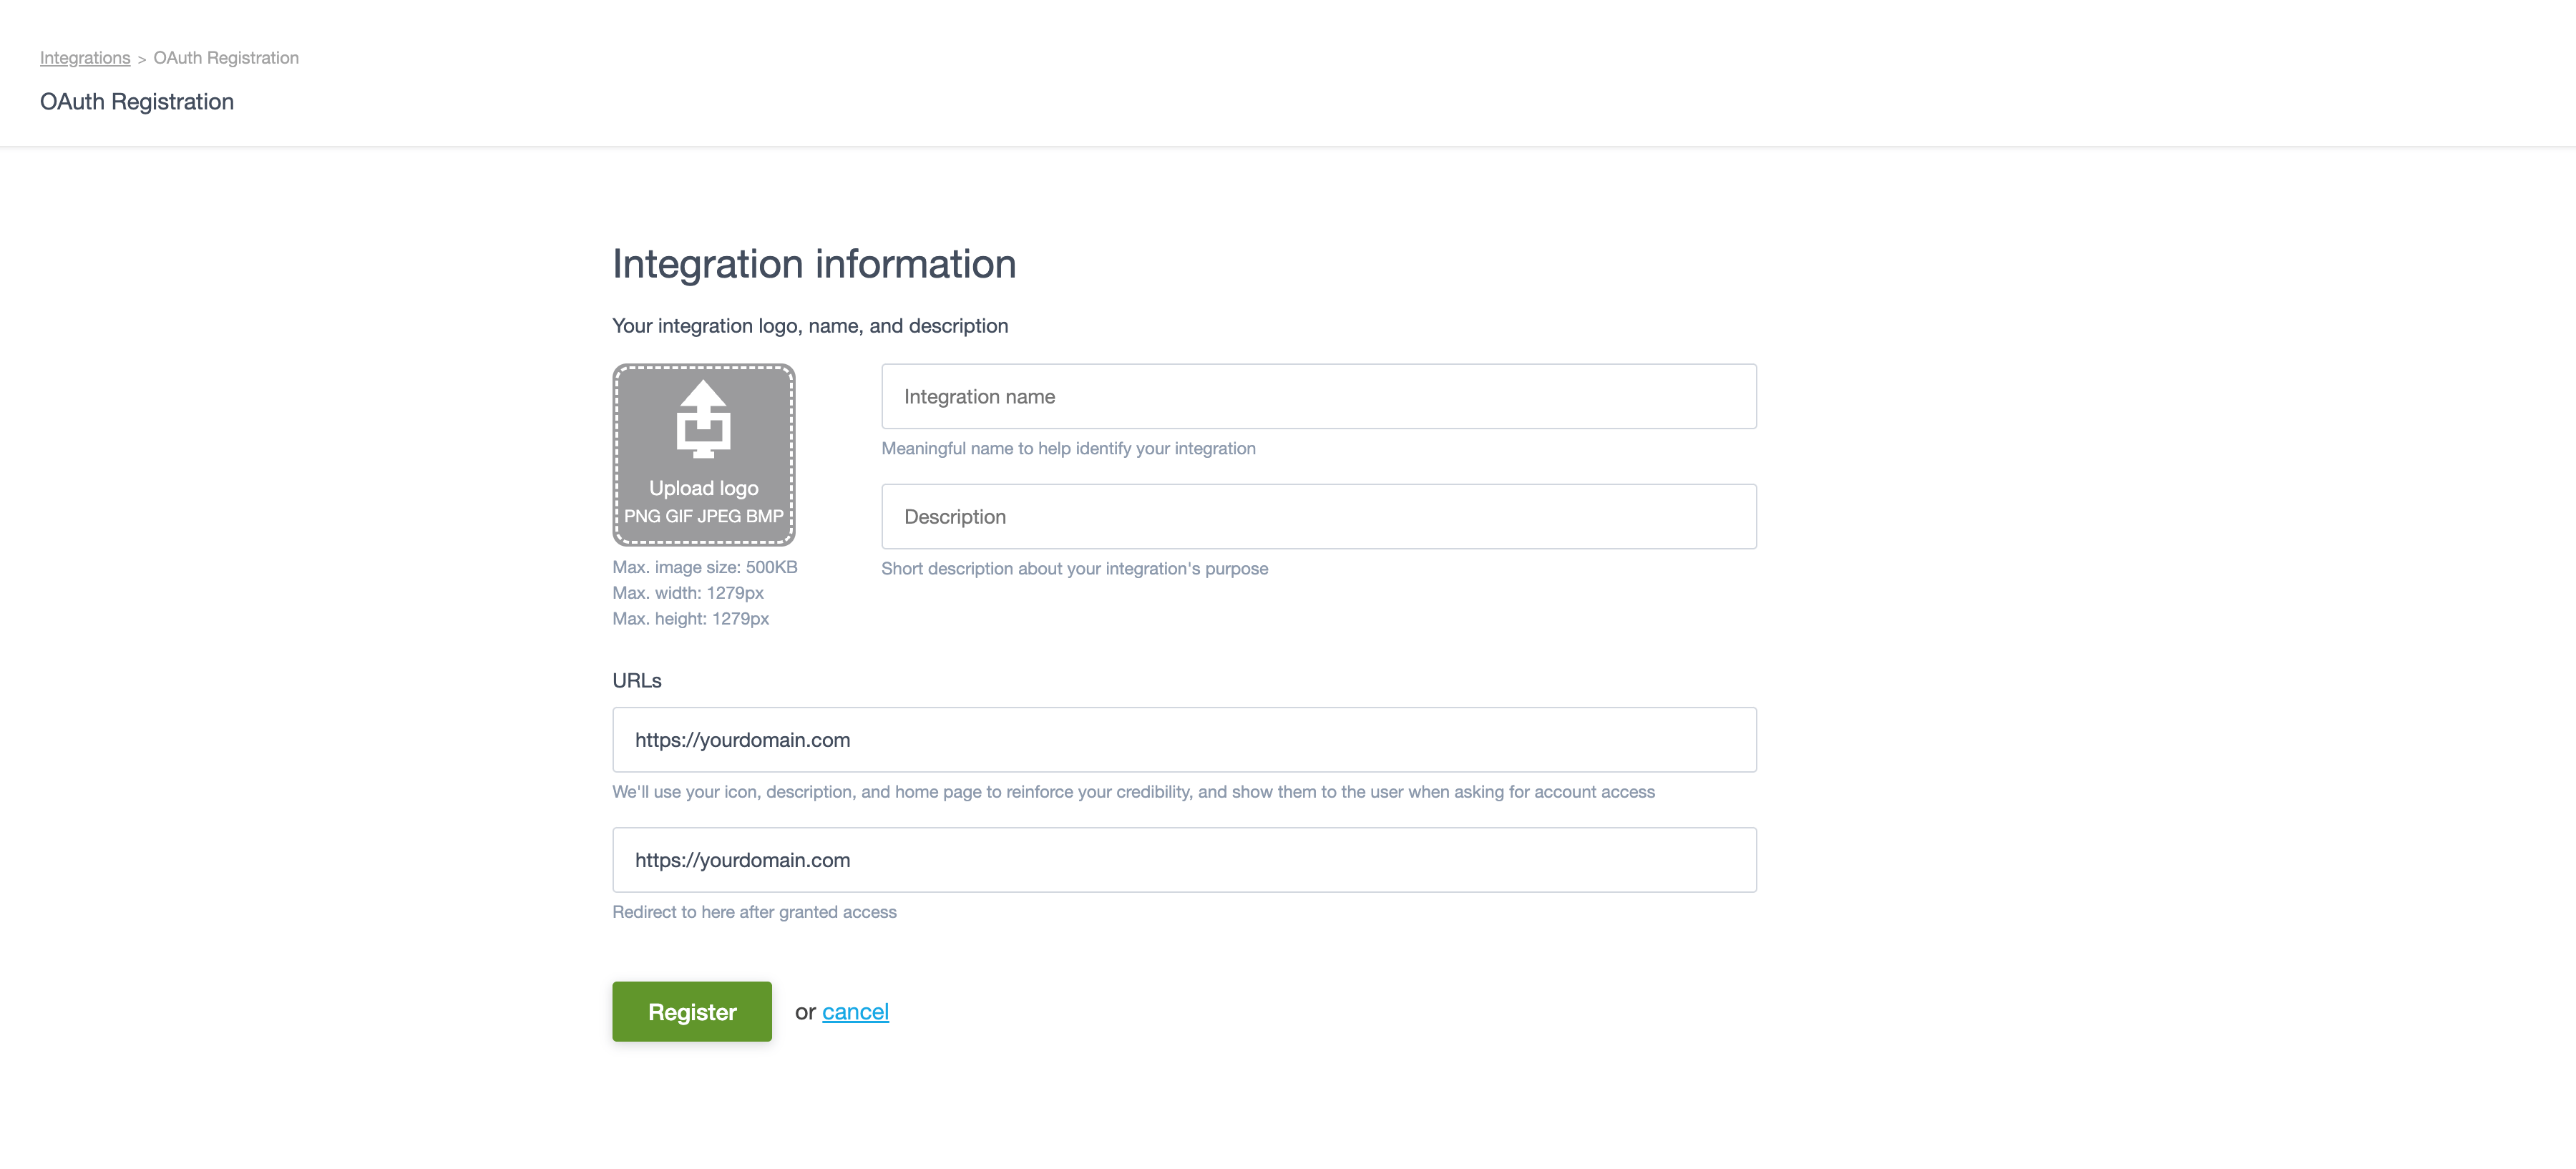
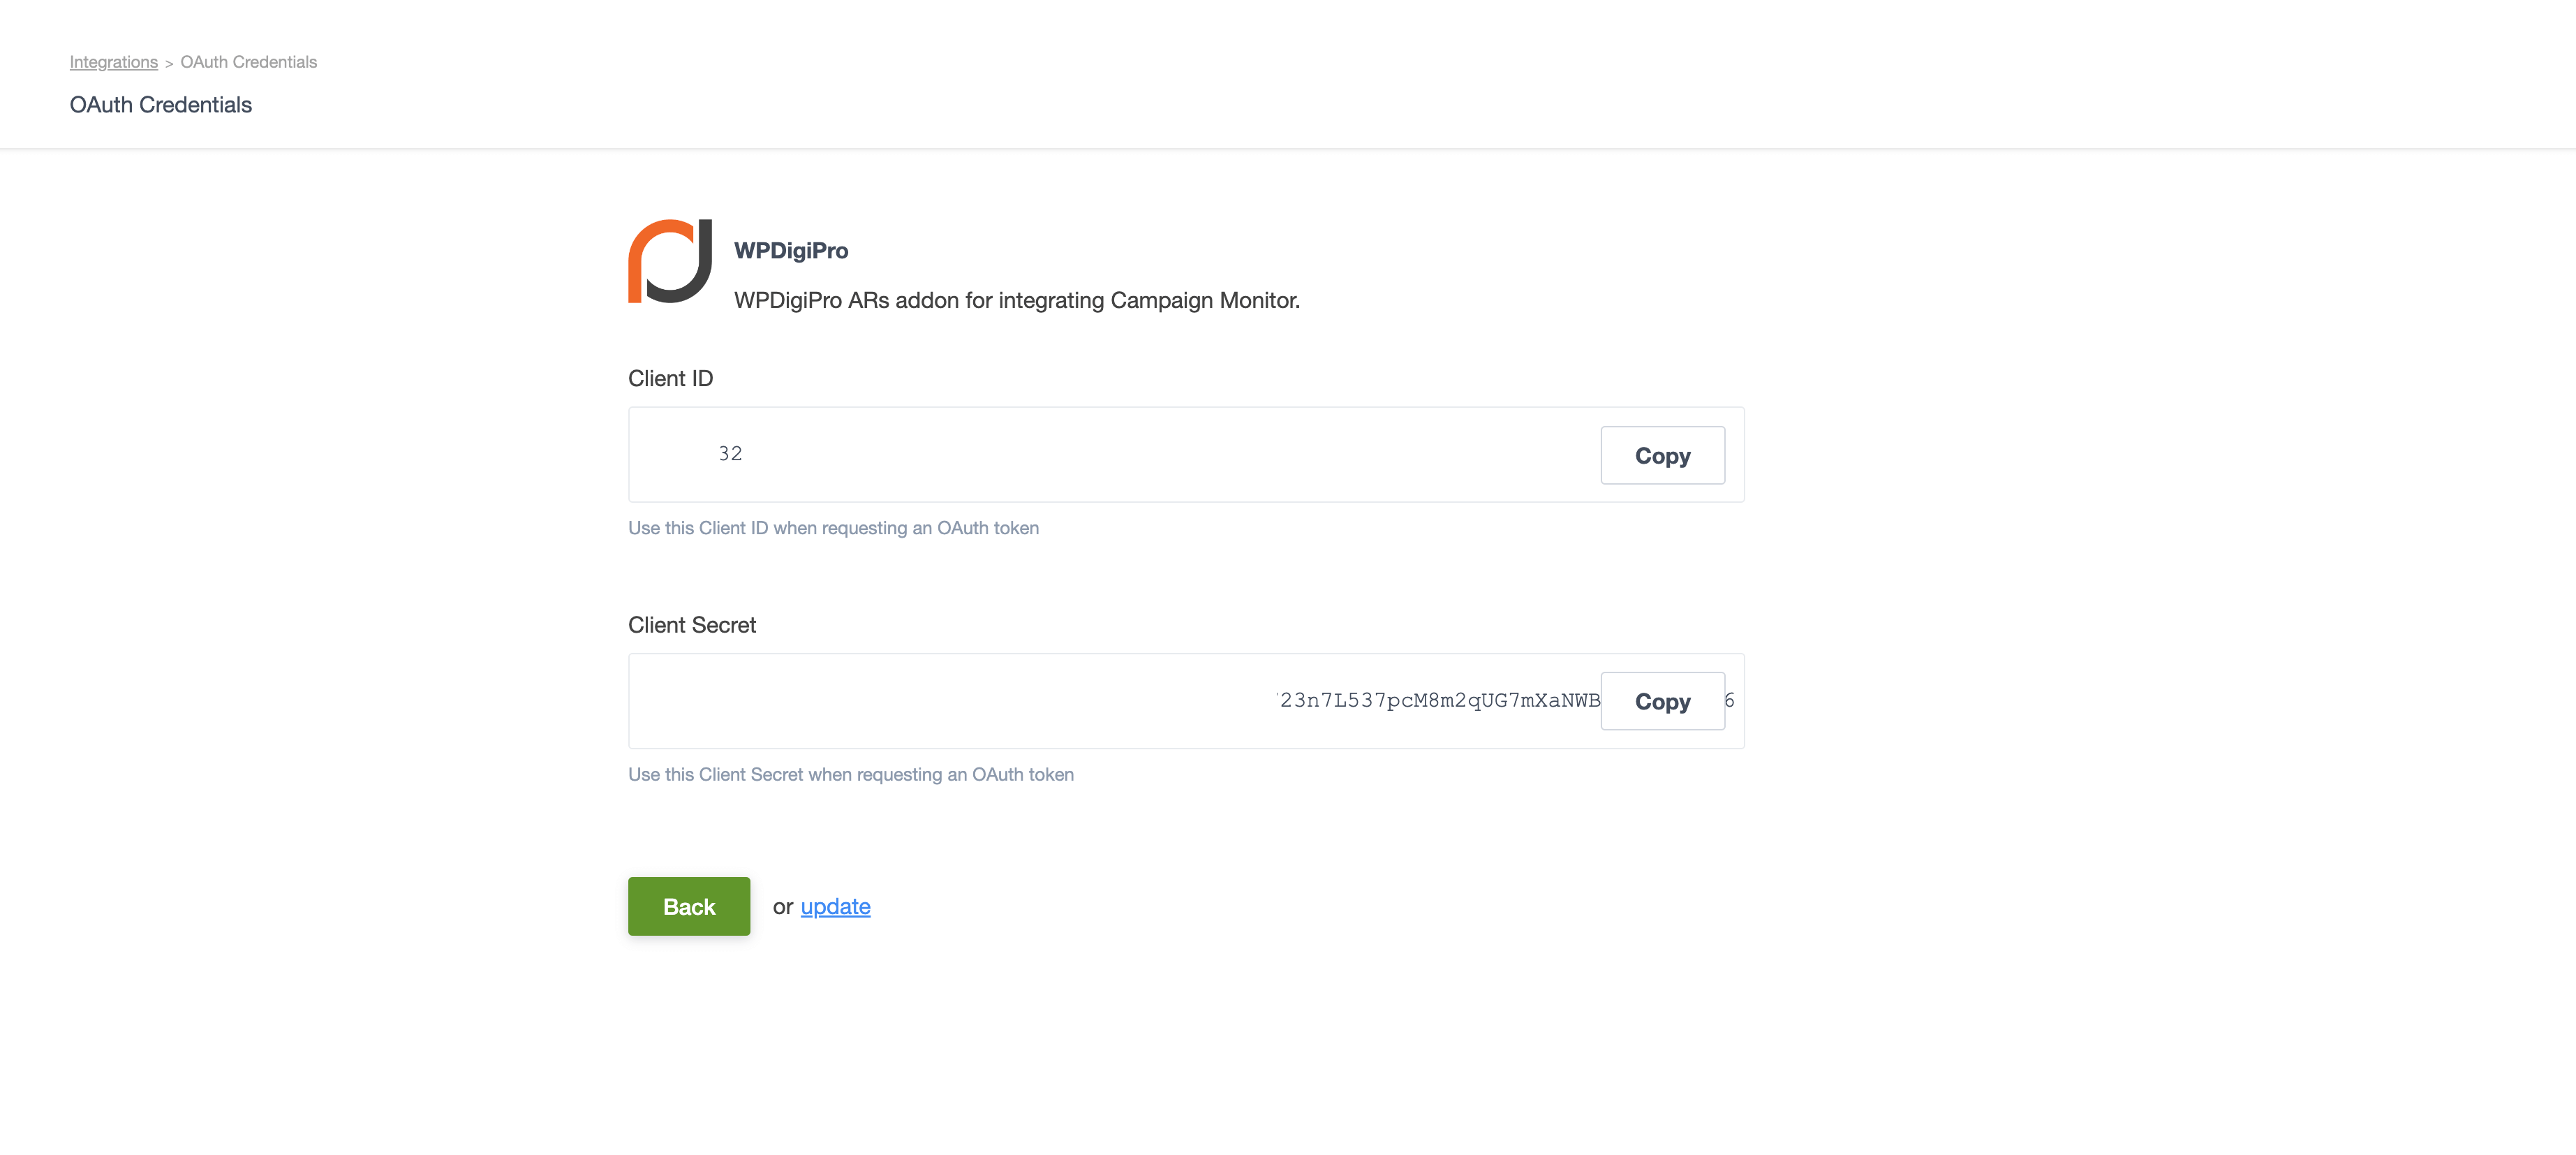
When you click on "Register" button, you will get your "Client ID" and "Client Secret" for API Access as shown below. That's it.
ConvertKit
If you don't have an account, you can create your ConvertKit account using this link.
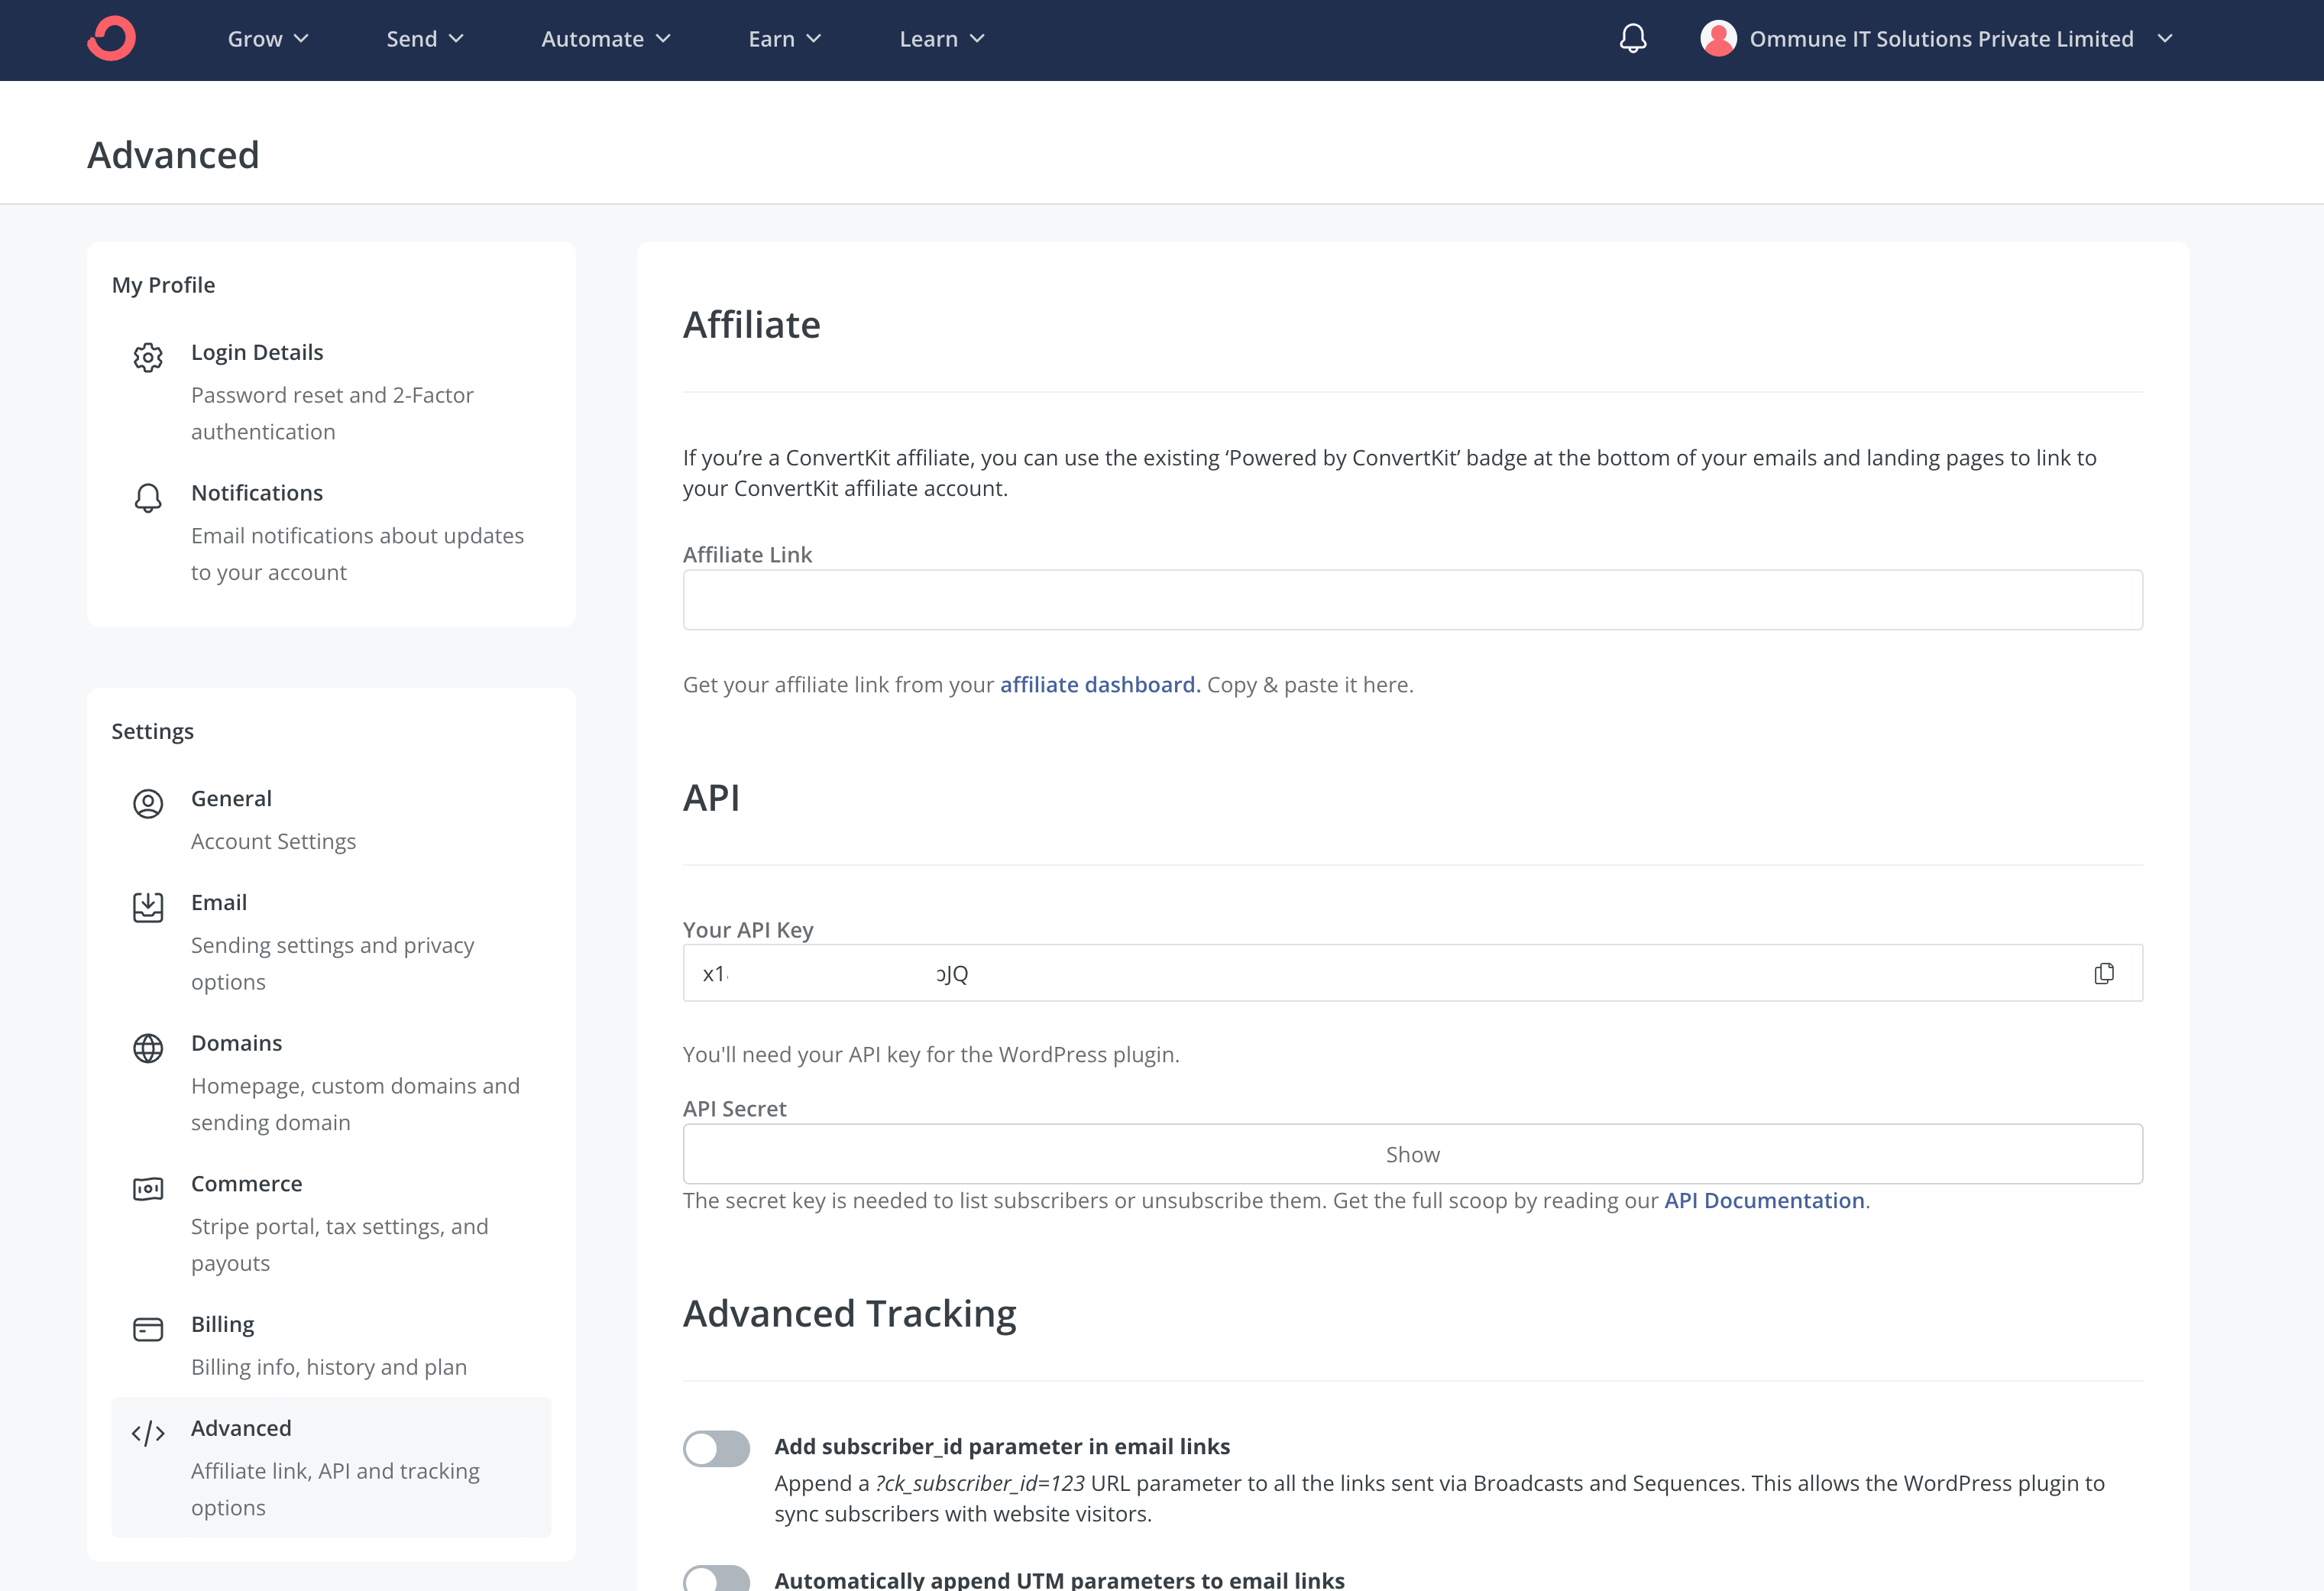
To create the "API Key" and "API Secret", just go here: : https://app.convertkit.com/account_settings/advanced_settings Please check the below screenshot for more clarity:
Constant Contact
If you don't have an account, you can create your Constant Contact account using this link.
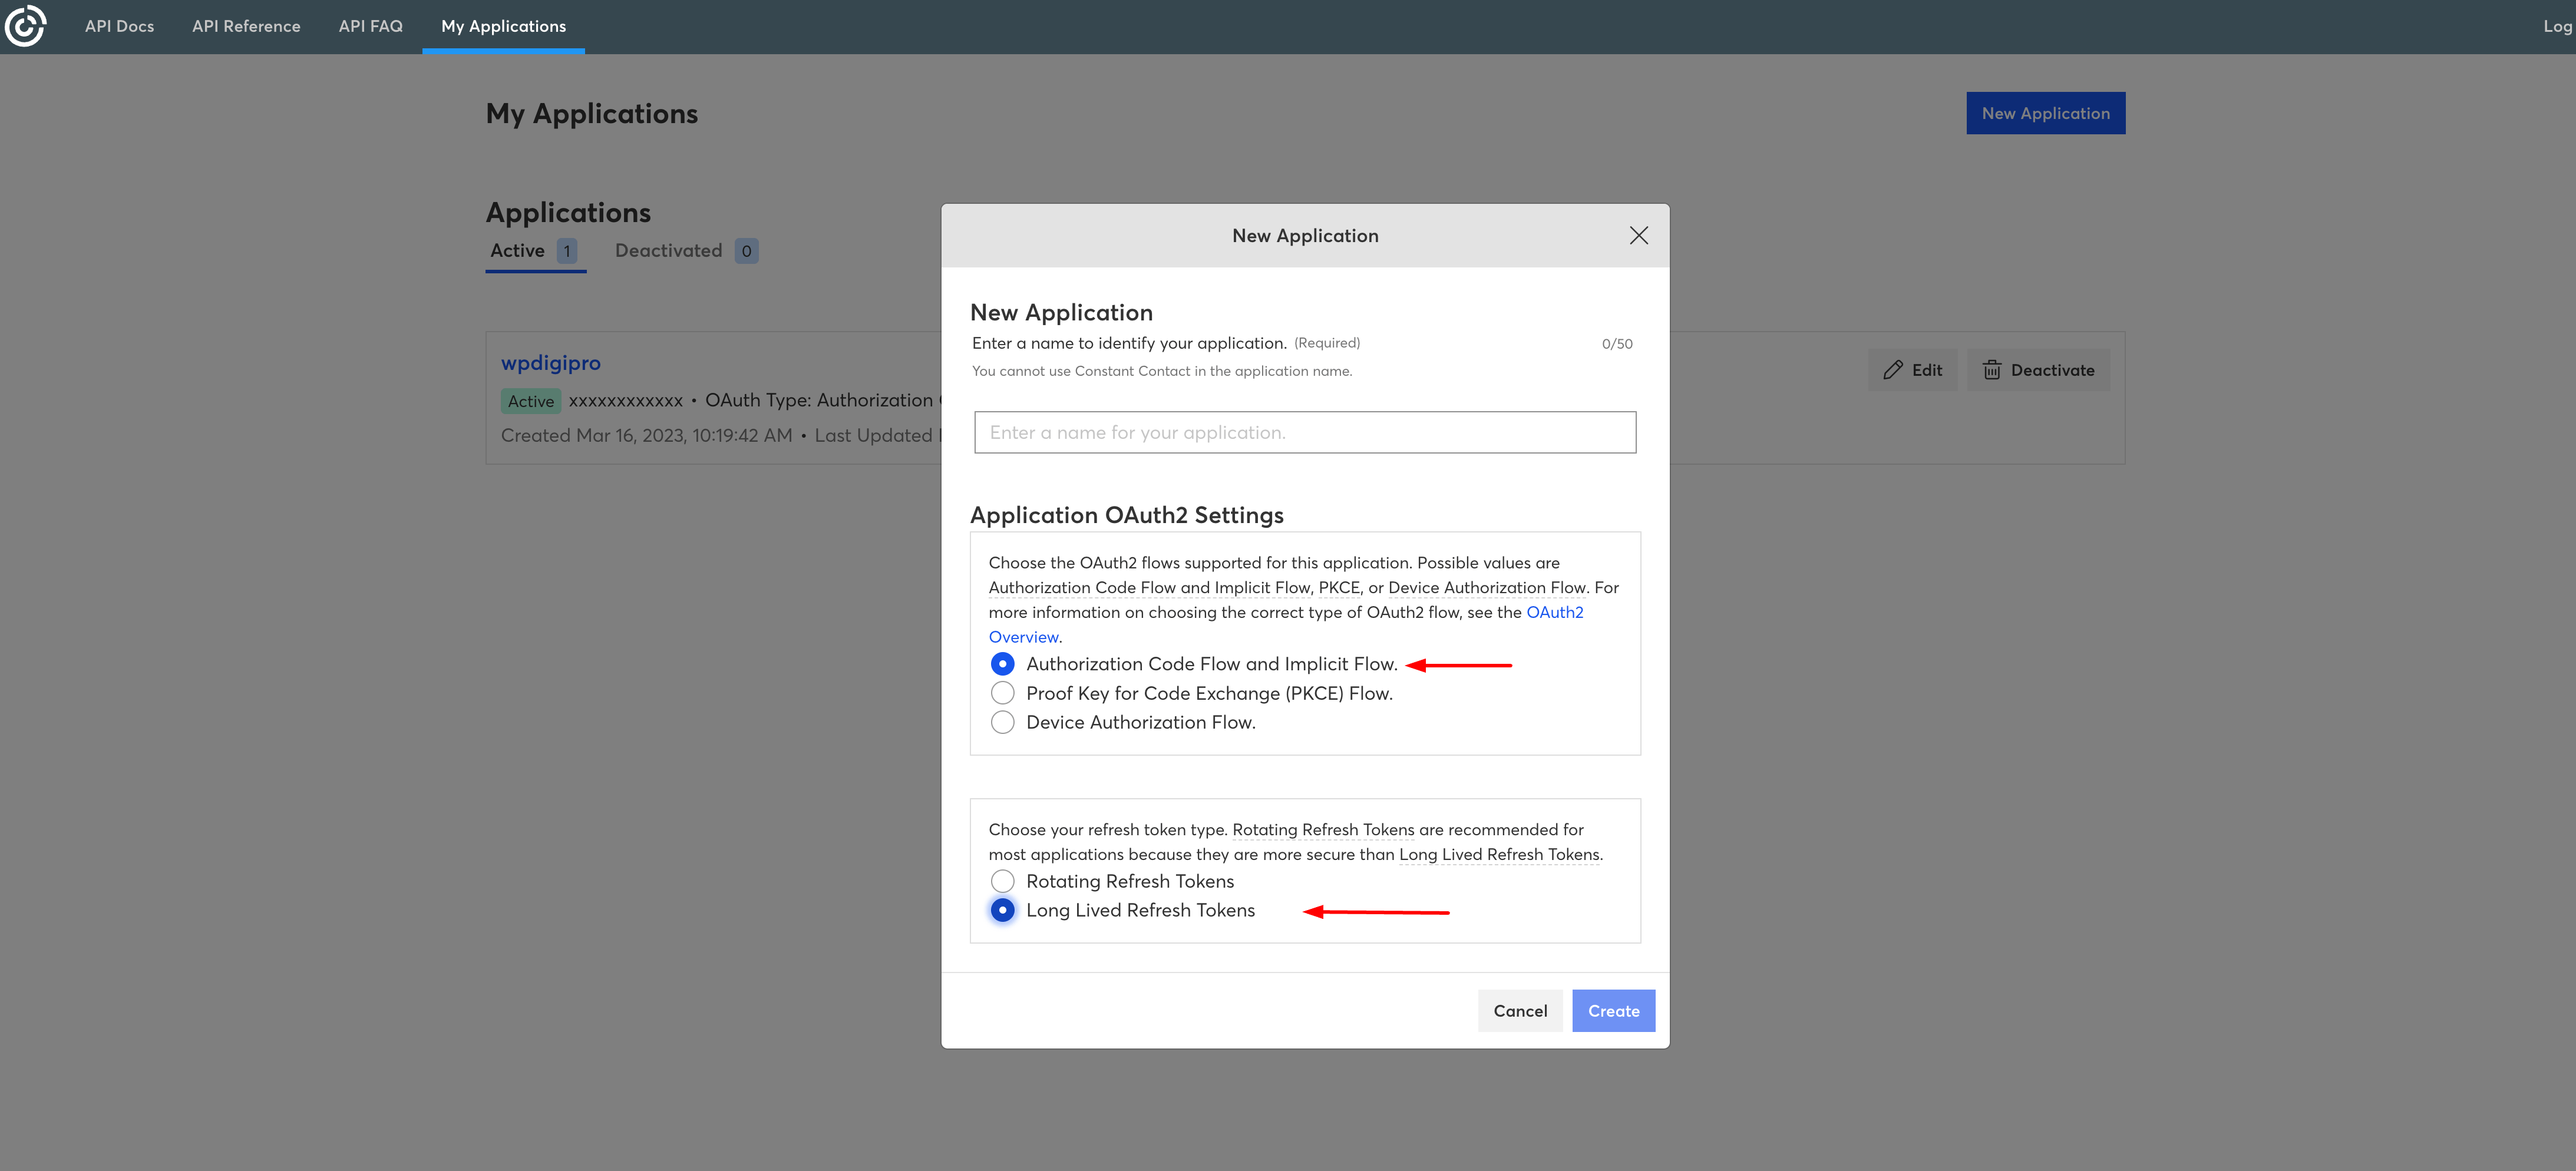
To create the "API Key (Client Id)" and "Client Secret", go here: : https://app.constantcontact.com/pages/dma/portal/ Click on "New Application" button. Select "Authorization Code Flow and Implicit Flow" and "Long Lived Refresh Tokens" as shown below:
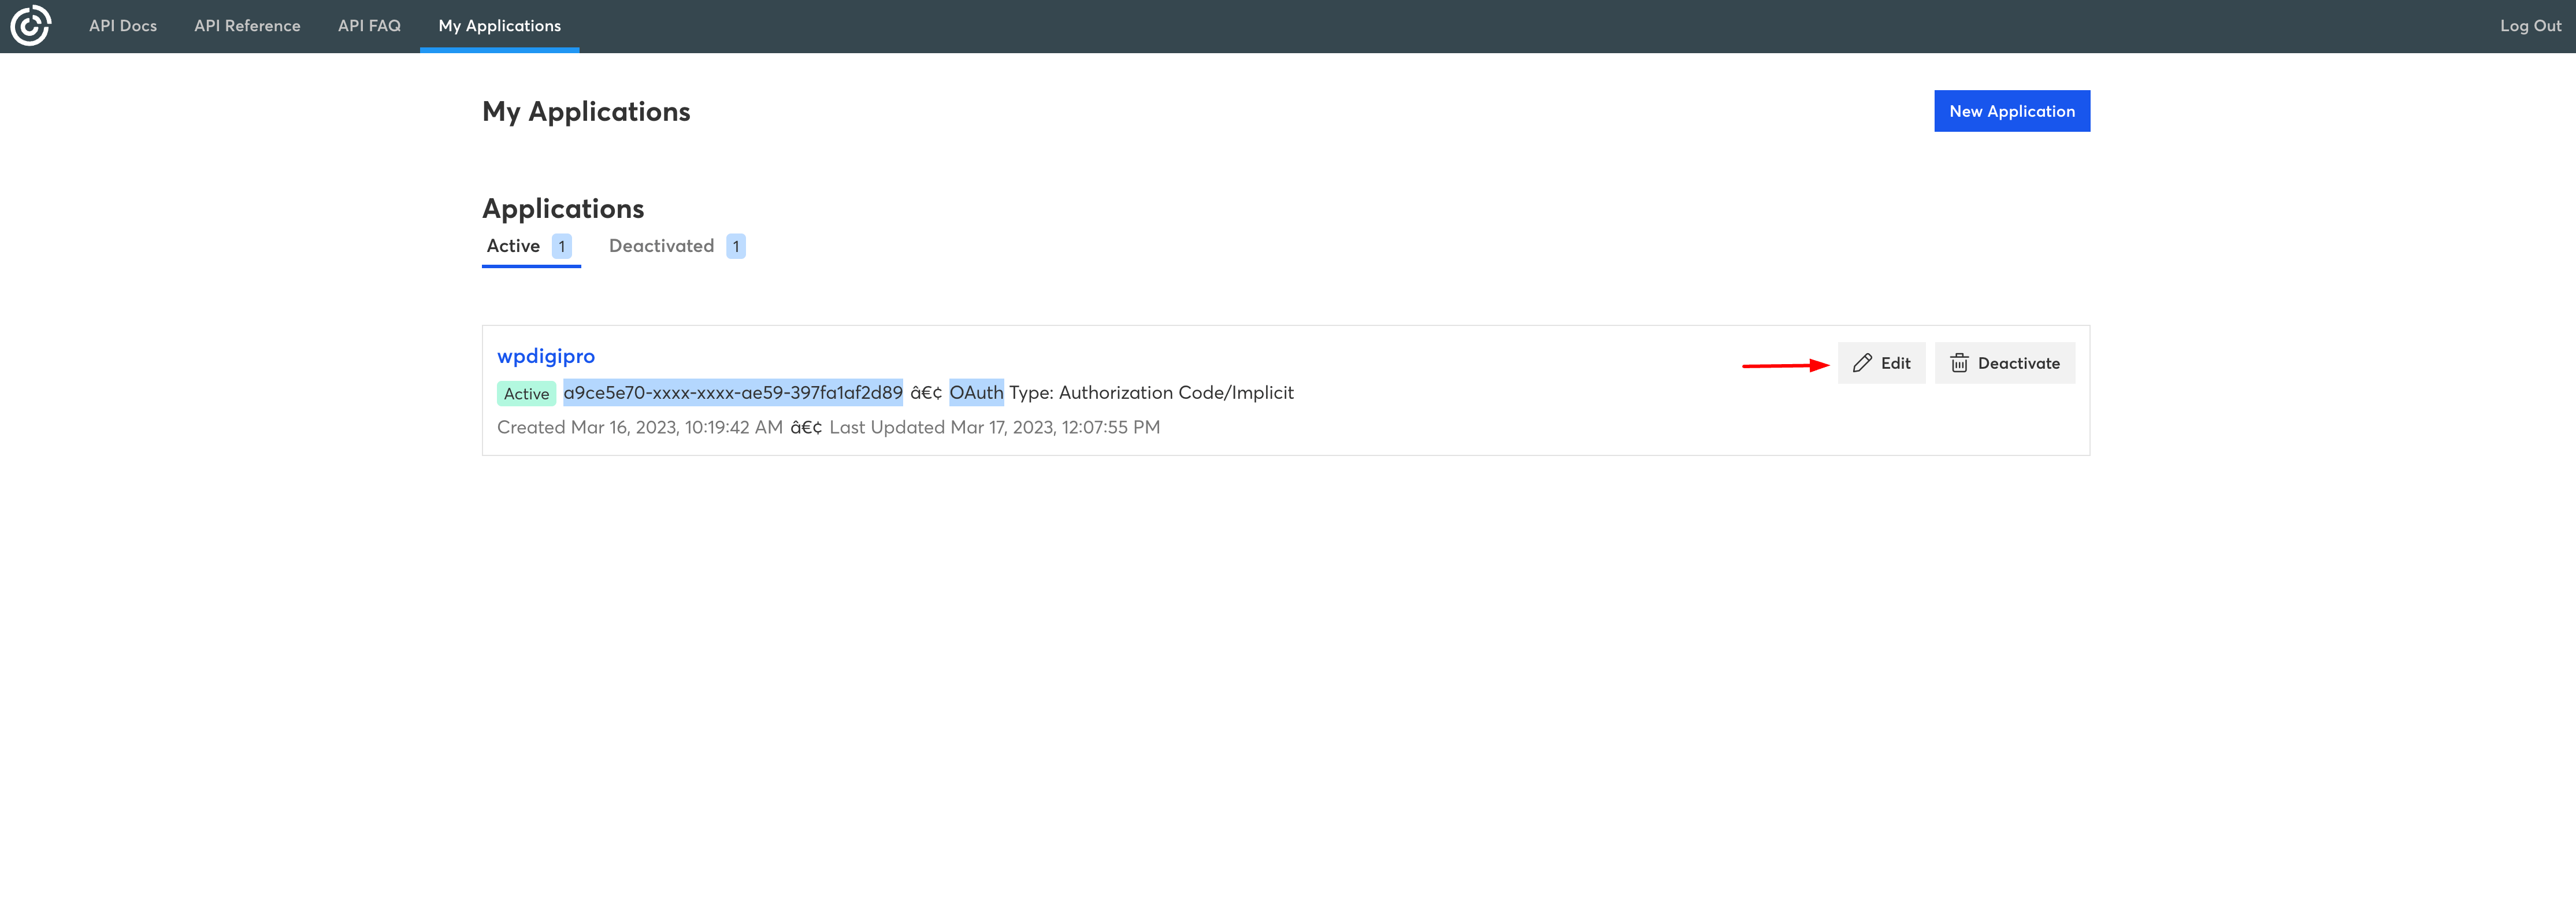
After hitting "Create" button, your app will be created. Now you will have to click on "Edit" button as shown below:
On this page, you will get your "API Key (Client Id)"" and you will be able to generate "Client Secret" after clicking on "Generate Client Secret" button as shown below. Also, you need to add Redirect URI as https://yourdomain.com/wp-admin/admin.php?page=arhive-wc-constantcontact-callback-url

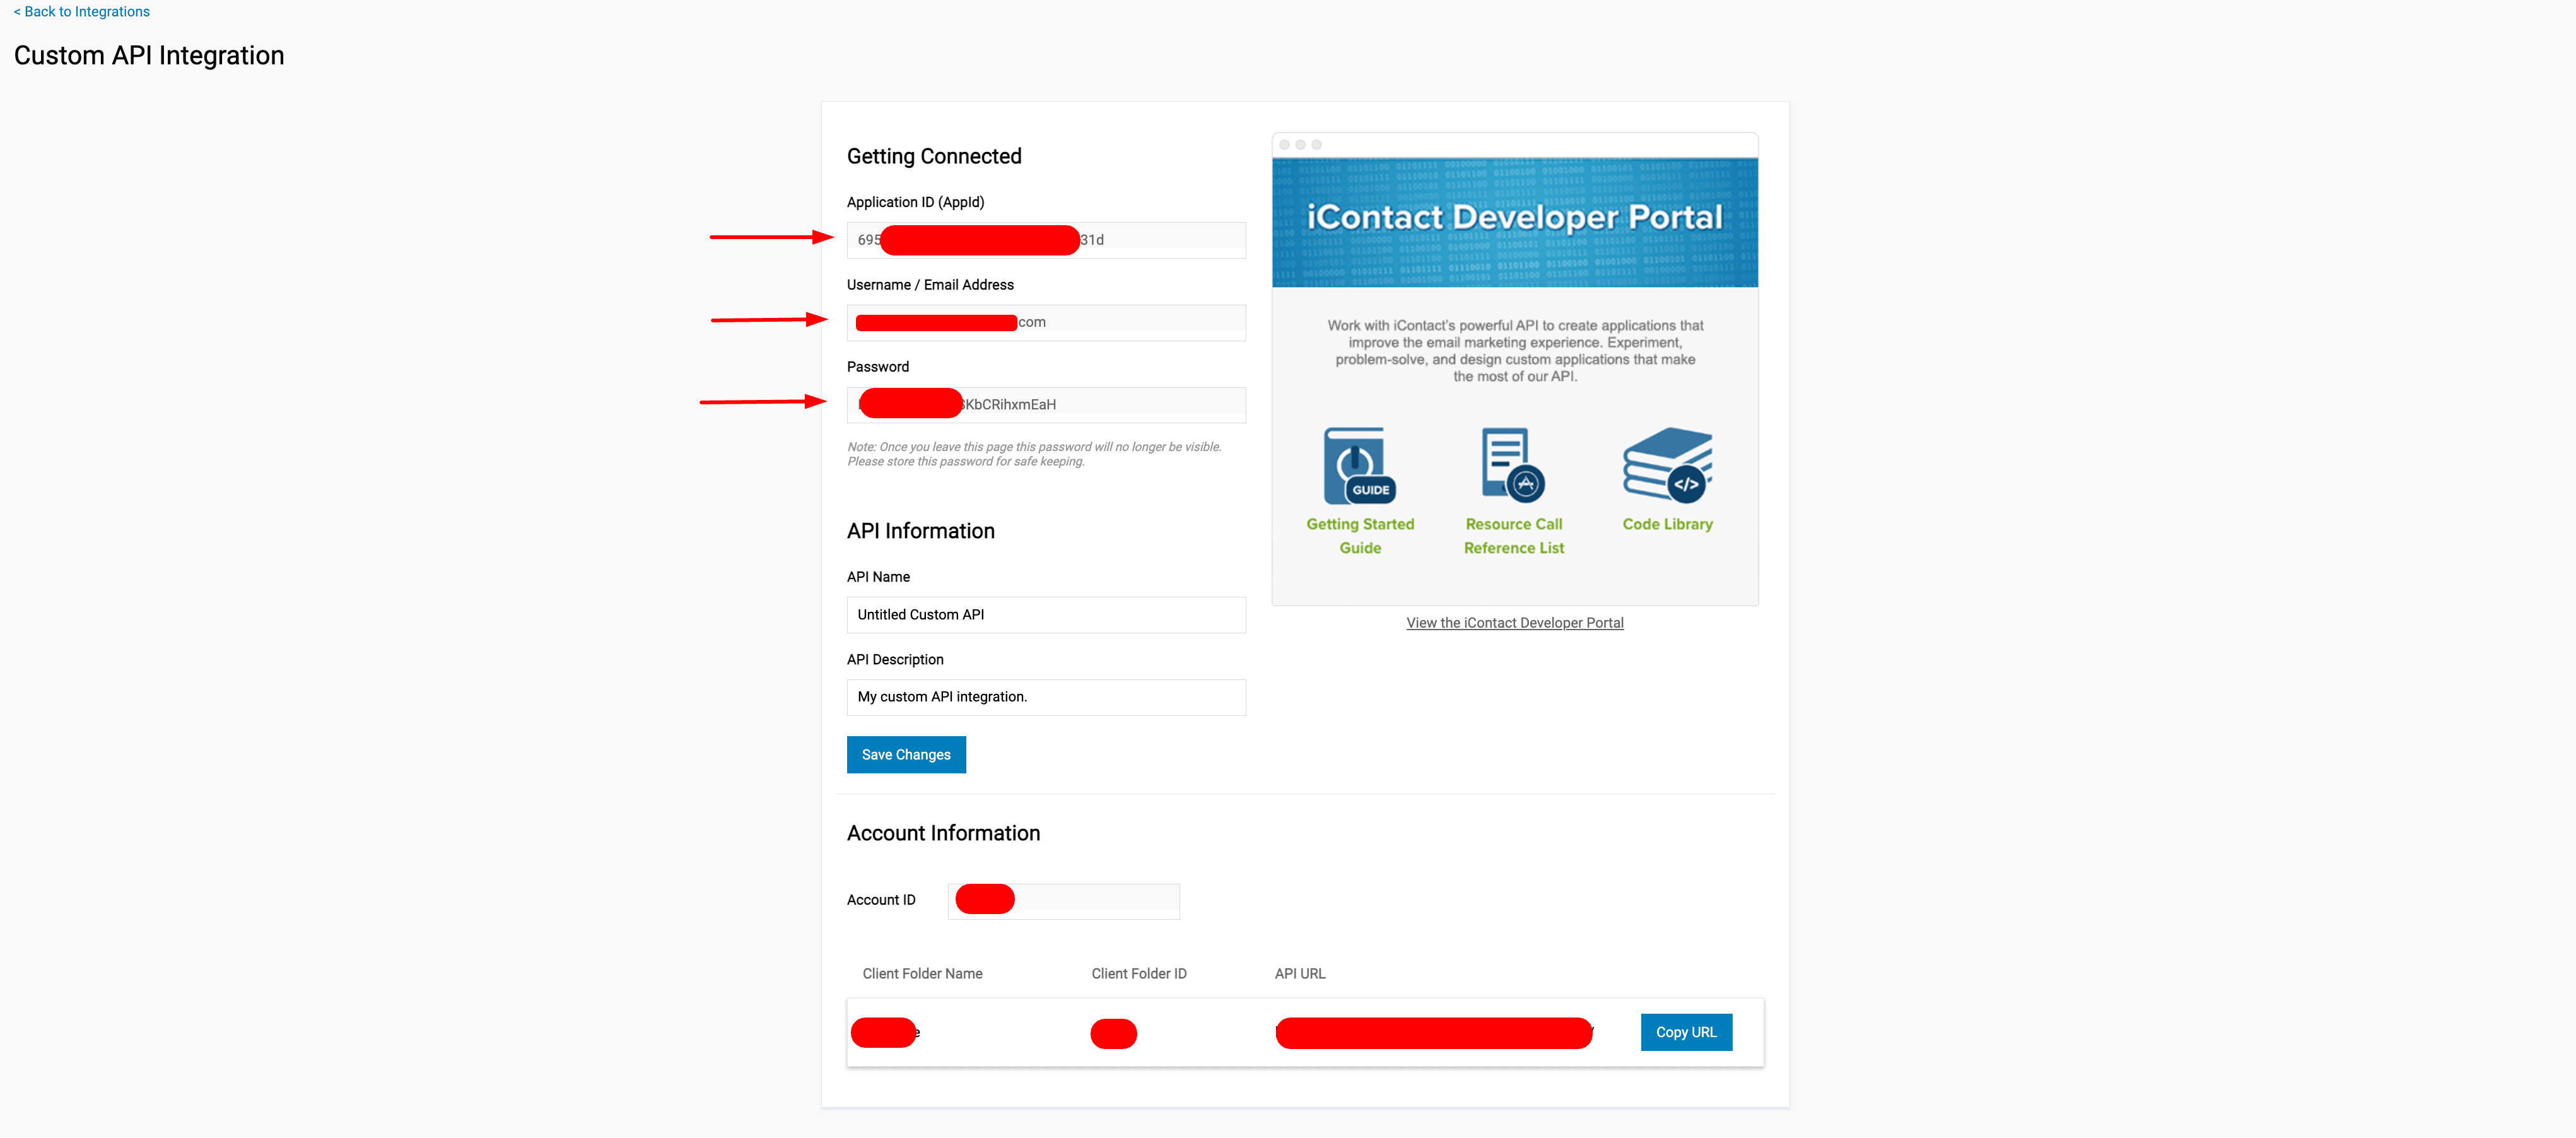
iContact
If you don't have an account, you can create your iContact account.
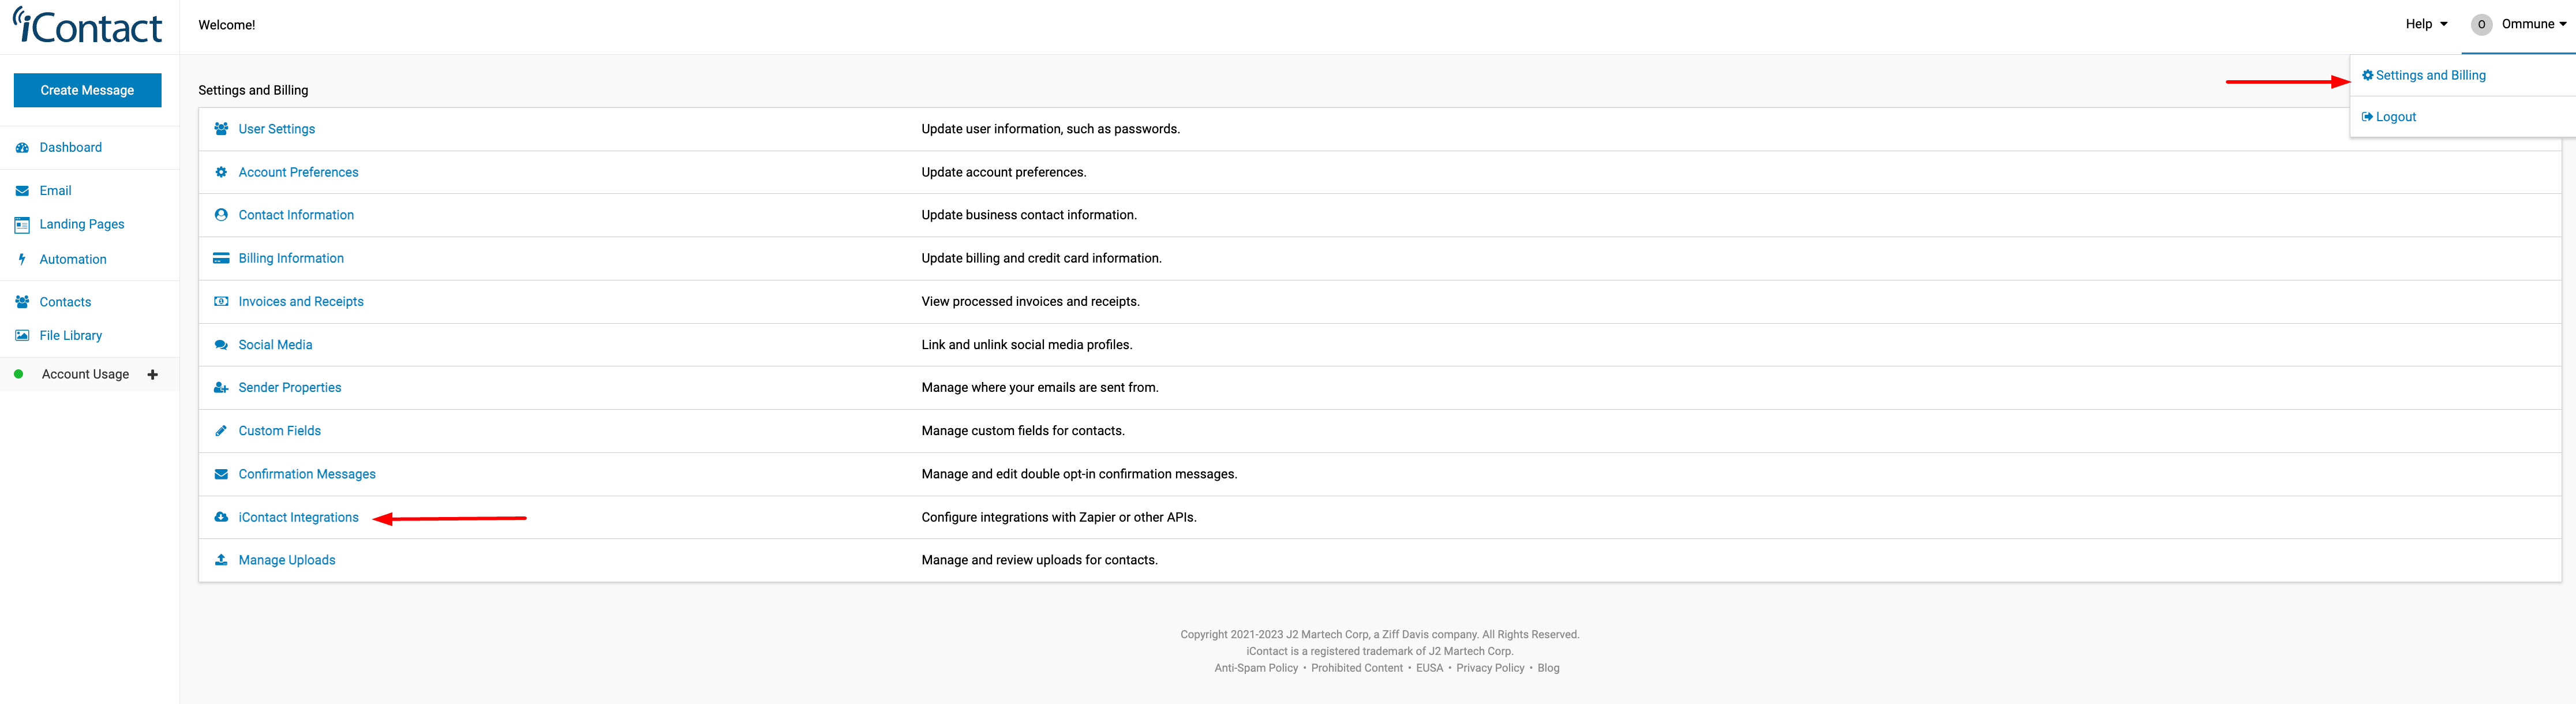
To get your AppID, Username and App Password. Check down arrow icon in extreme right hand side under your company name as shown below.
Click on "Settings and Billing" and then click on "iContact Integrations".
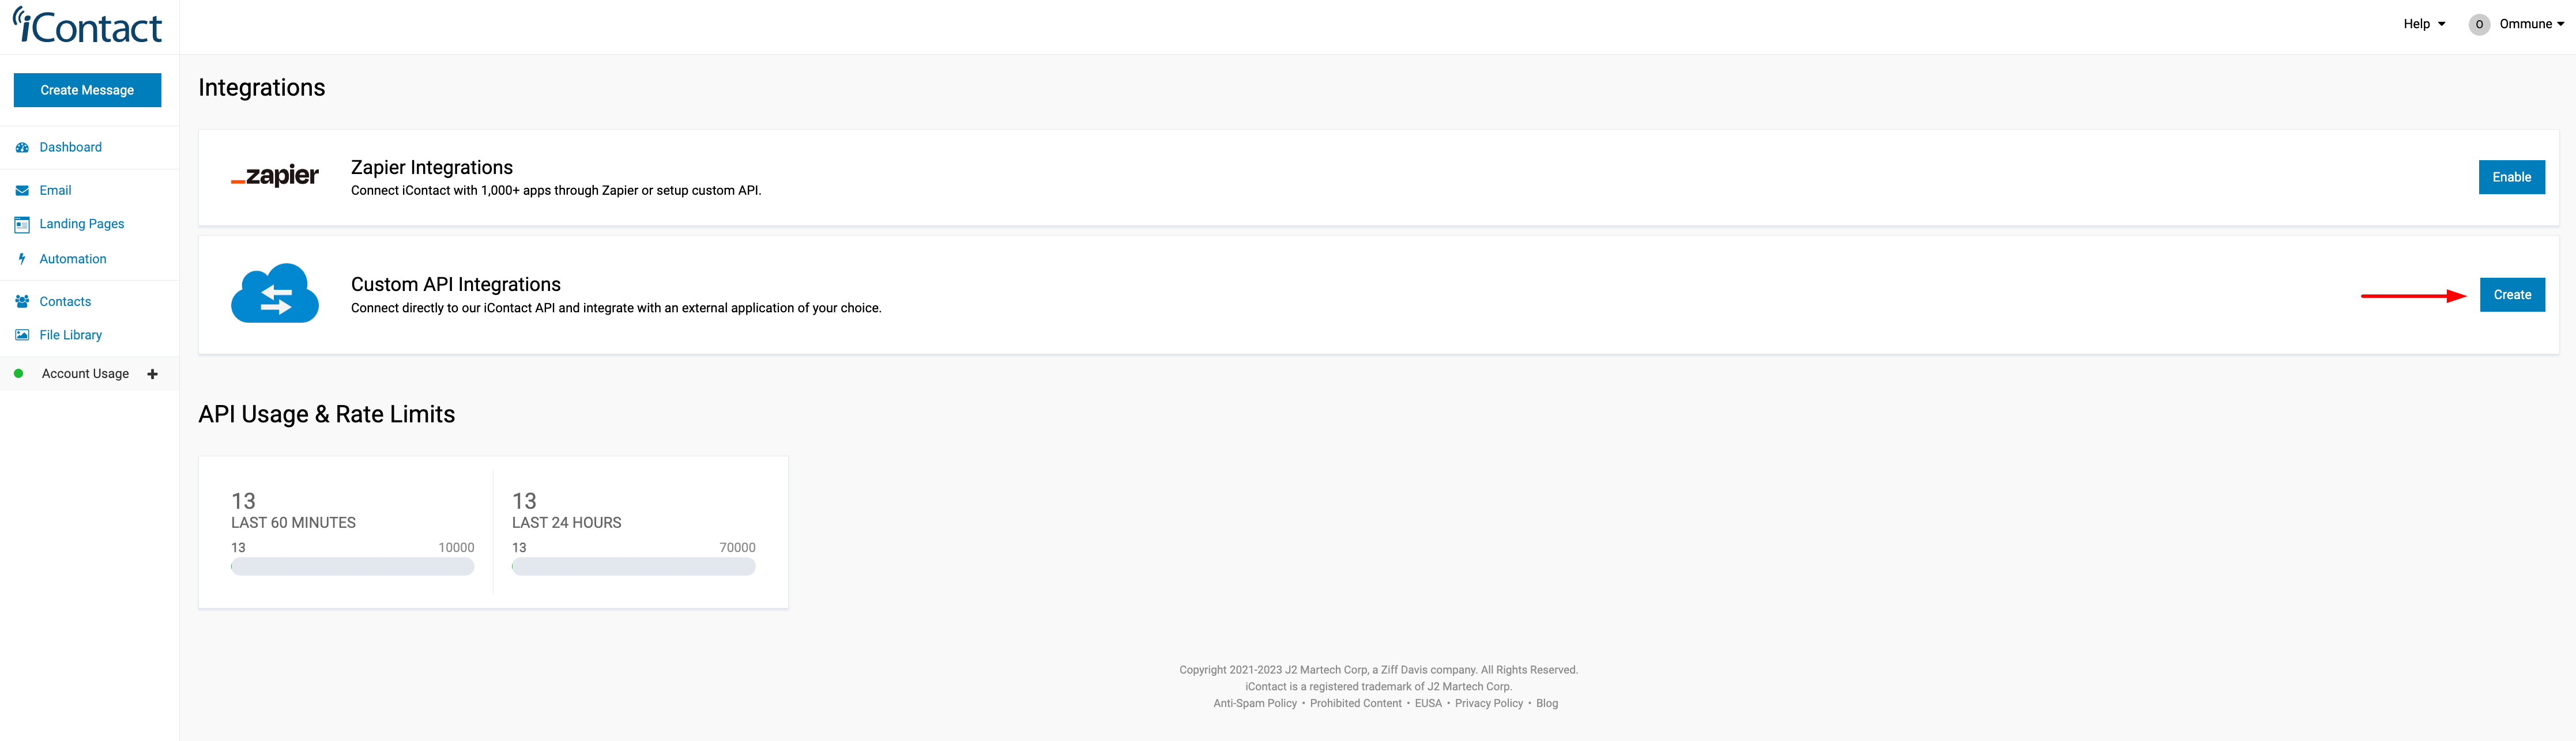
After that click on "Create" Button in Front of "Custom API Integrations" box as shown below:
You will get all the 3 fields there: AppID, Username and App Password as shown below:
Mailwizz EMA
If you don't have Mailwizz EMA, you can buy Mailwizz EMA using this link.
Suppse you install MailWizz at https://yourdomain.com/mailwizz then your API URL will be https://yourdomain.com/mailwizz/api/index.php
To get the "Public Key" just go here: : https://yourdomain.com/mailwizz/customer/index.php/api-keys/index and click on "Create New" button as shown below:
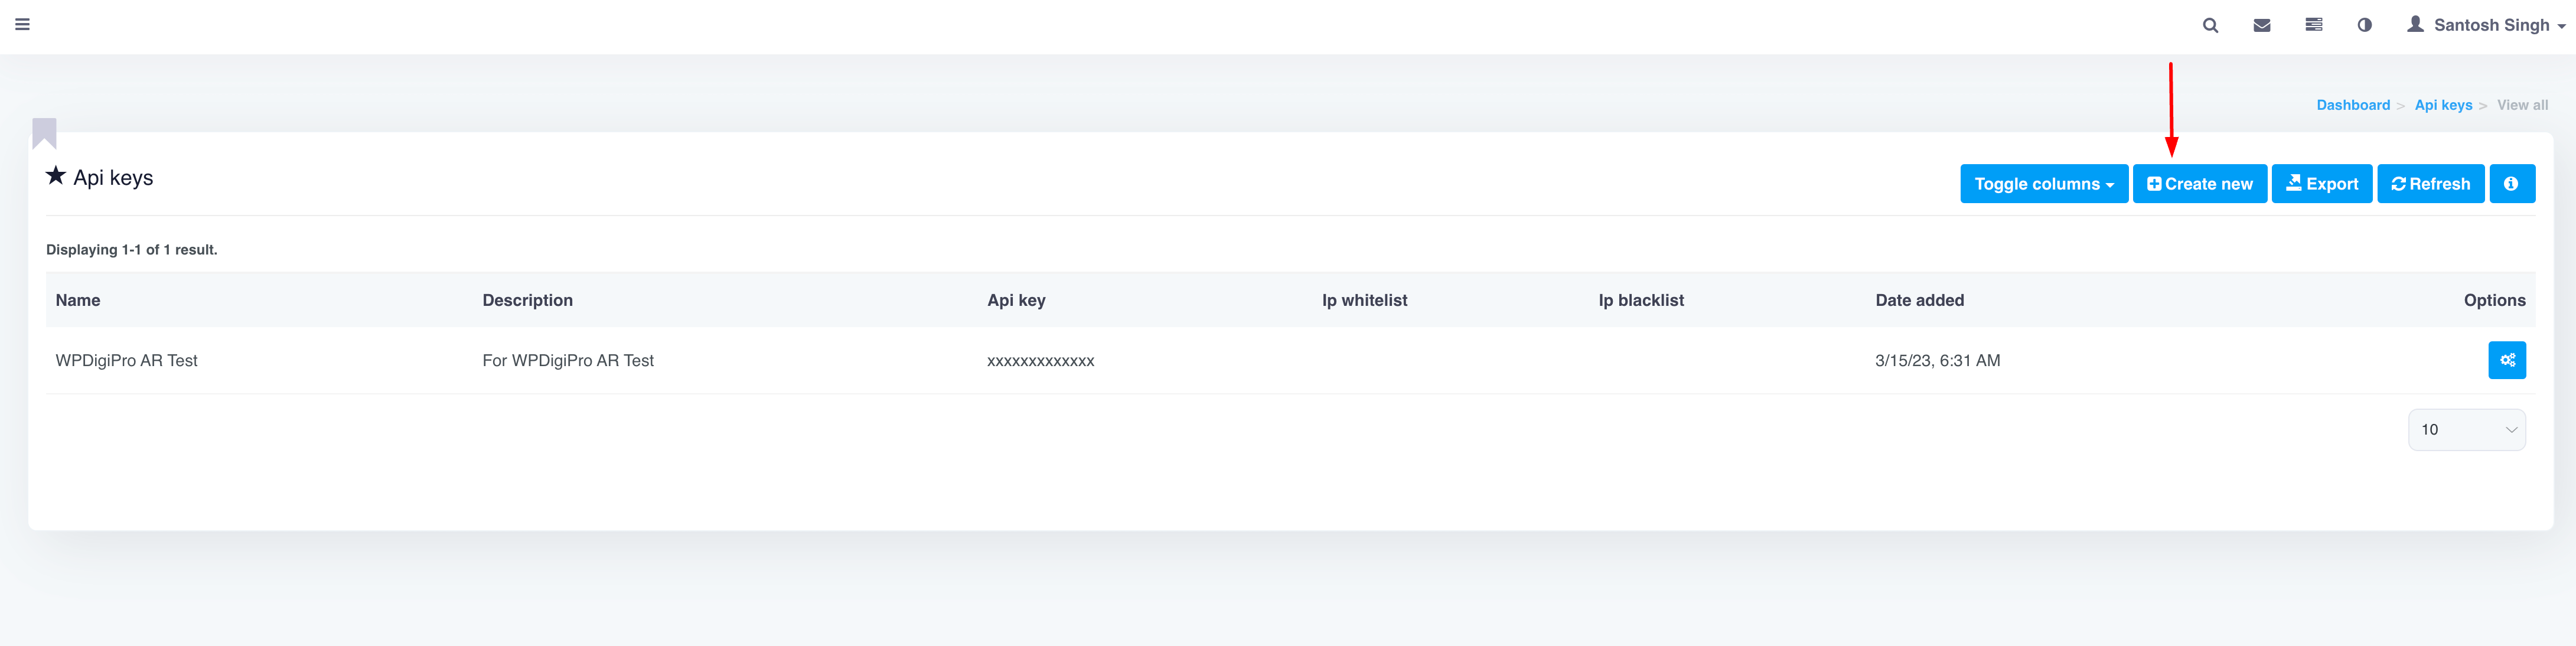
Drip
If you don't have an account, you can create your Drip account using this link.
To get the "API Token" just go here: : https://www.getdrip.com/user/edit
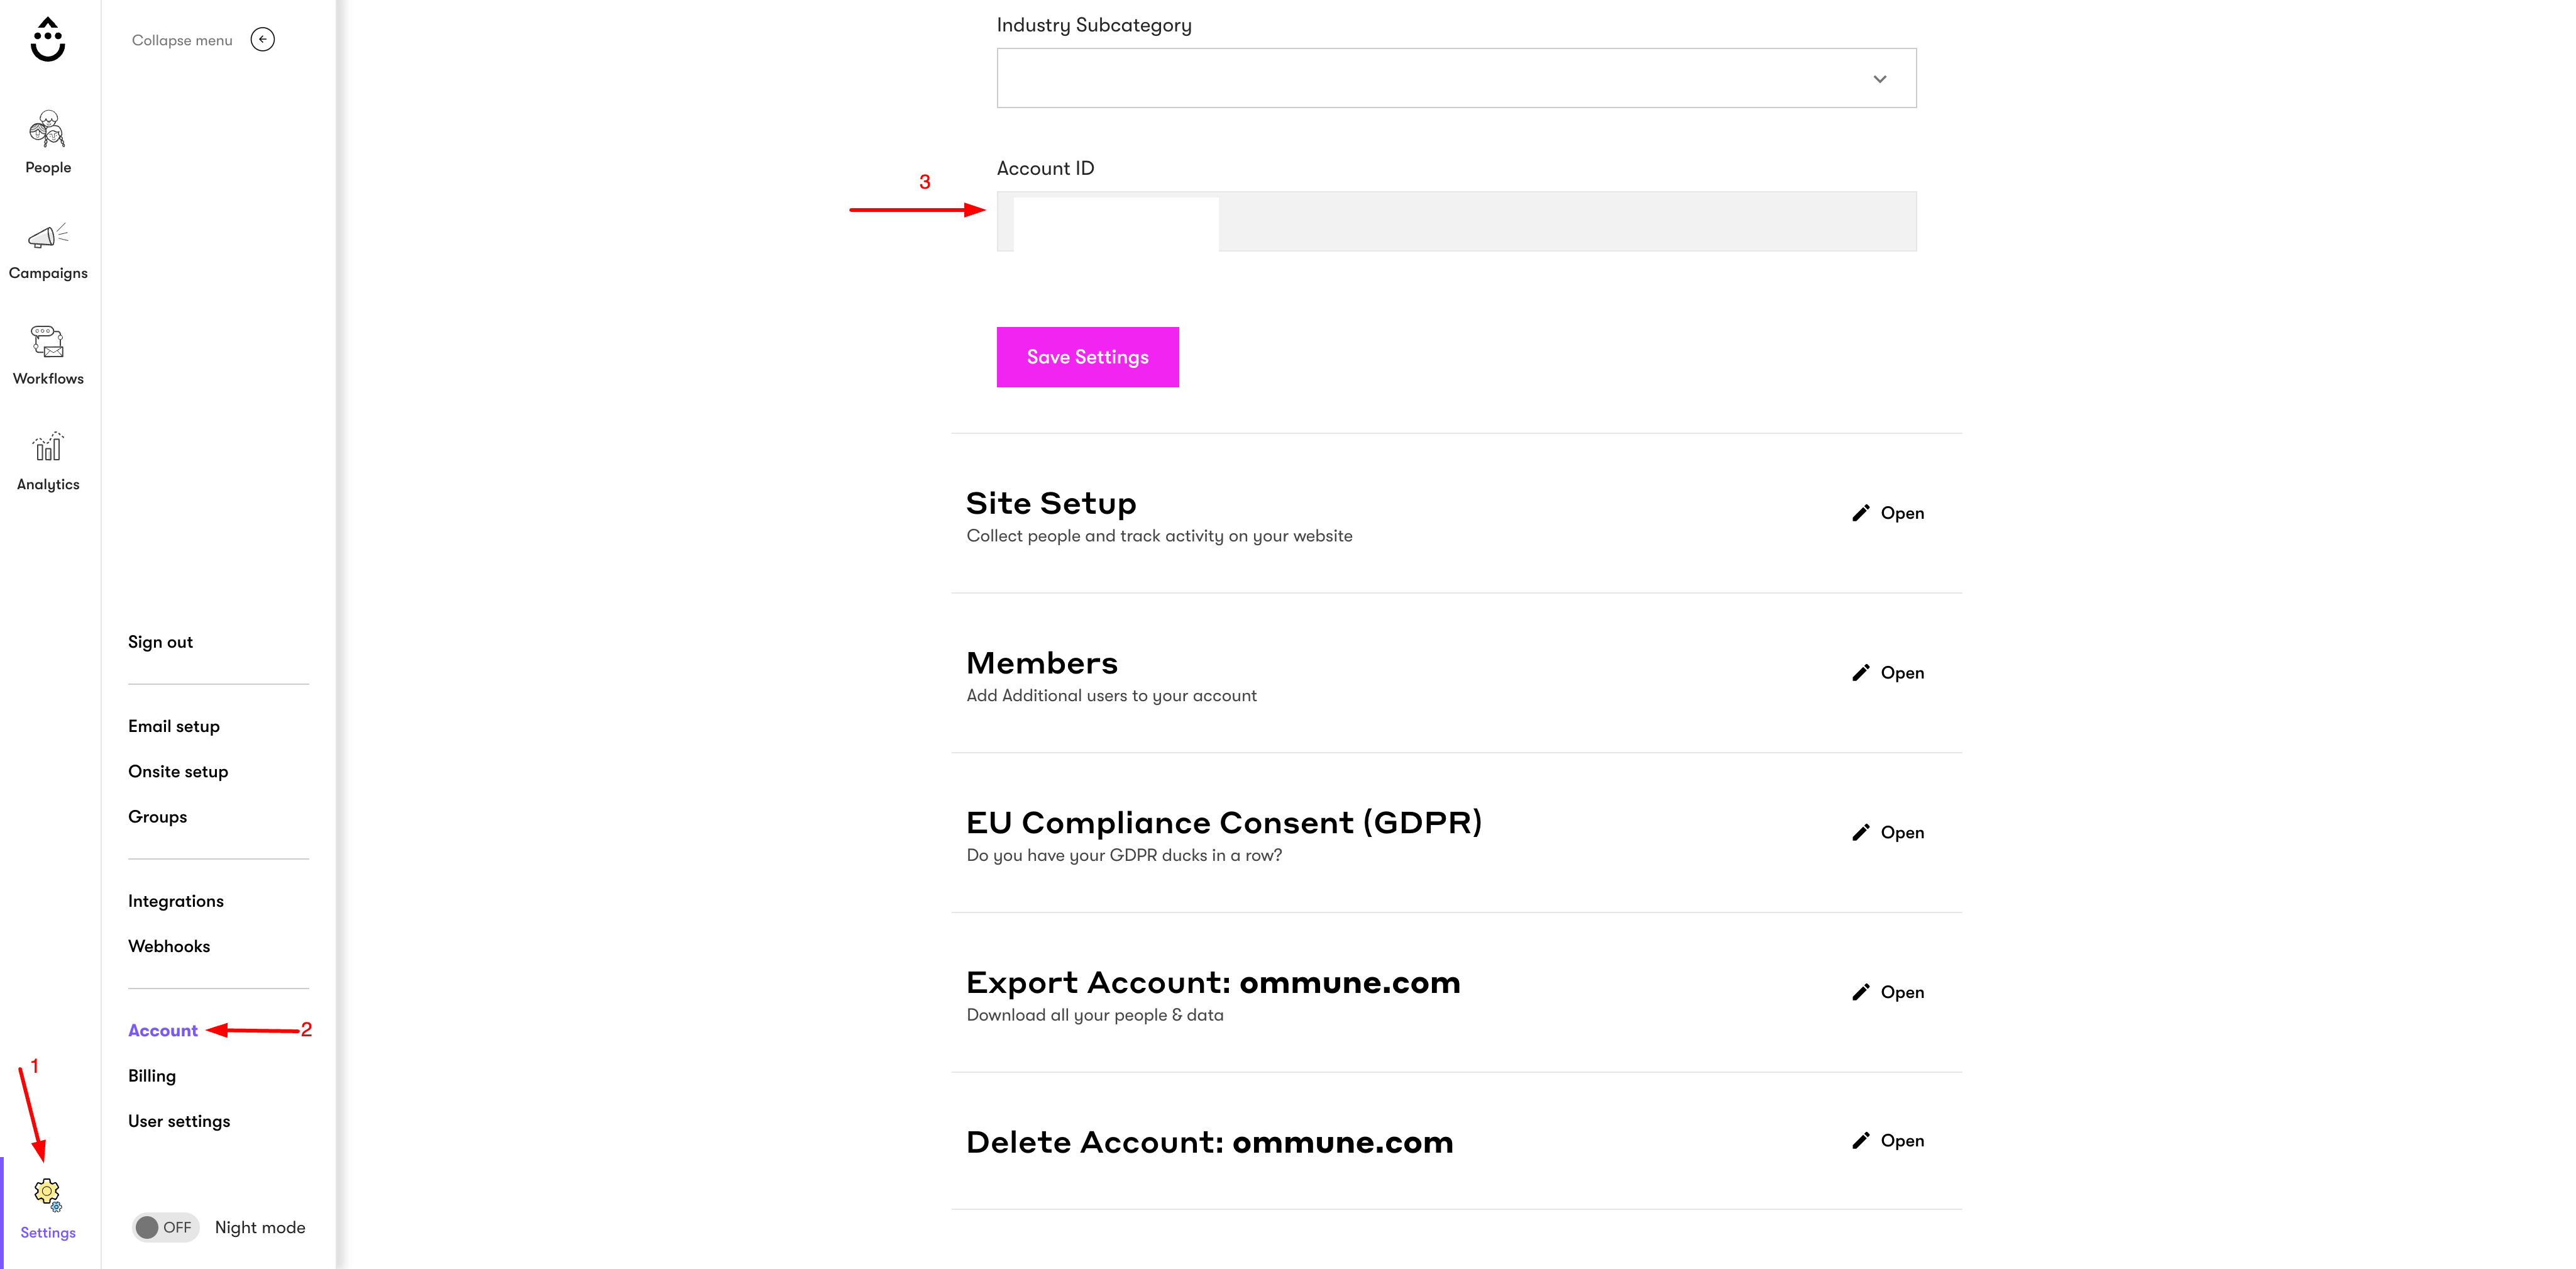
To get the "Account ID" just follow following screenshot
Mautic
If you don't have Mautic, you can download Mautic for free using this link.
Suppse you install Mautic at https://yourdomain.com/mautic then first of all you need to enable API here https://yourdomain.com/mautic/s/config/edit as shown below:
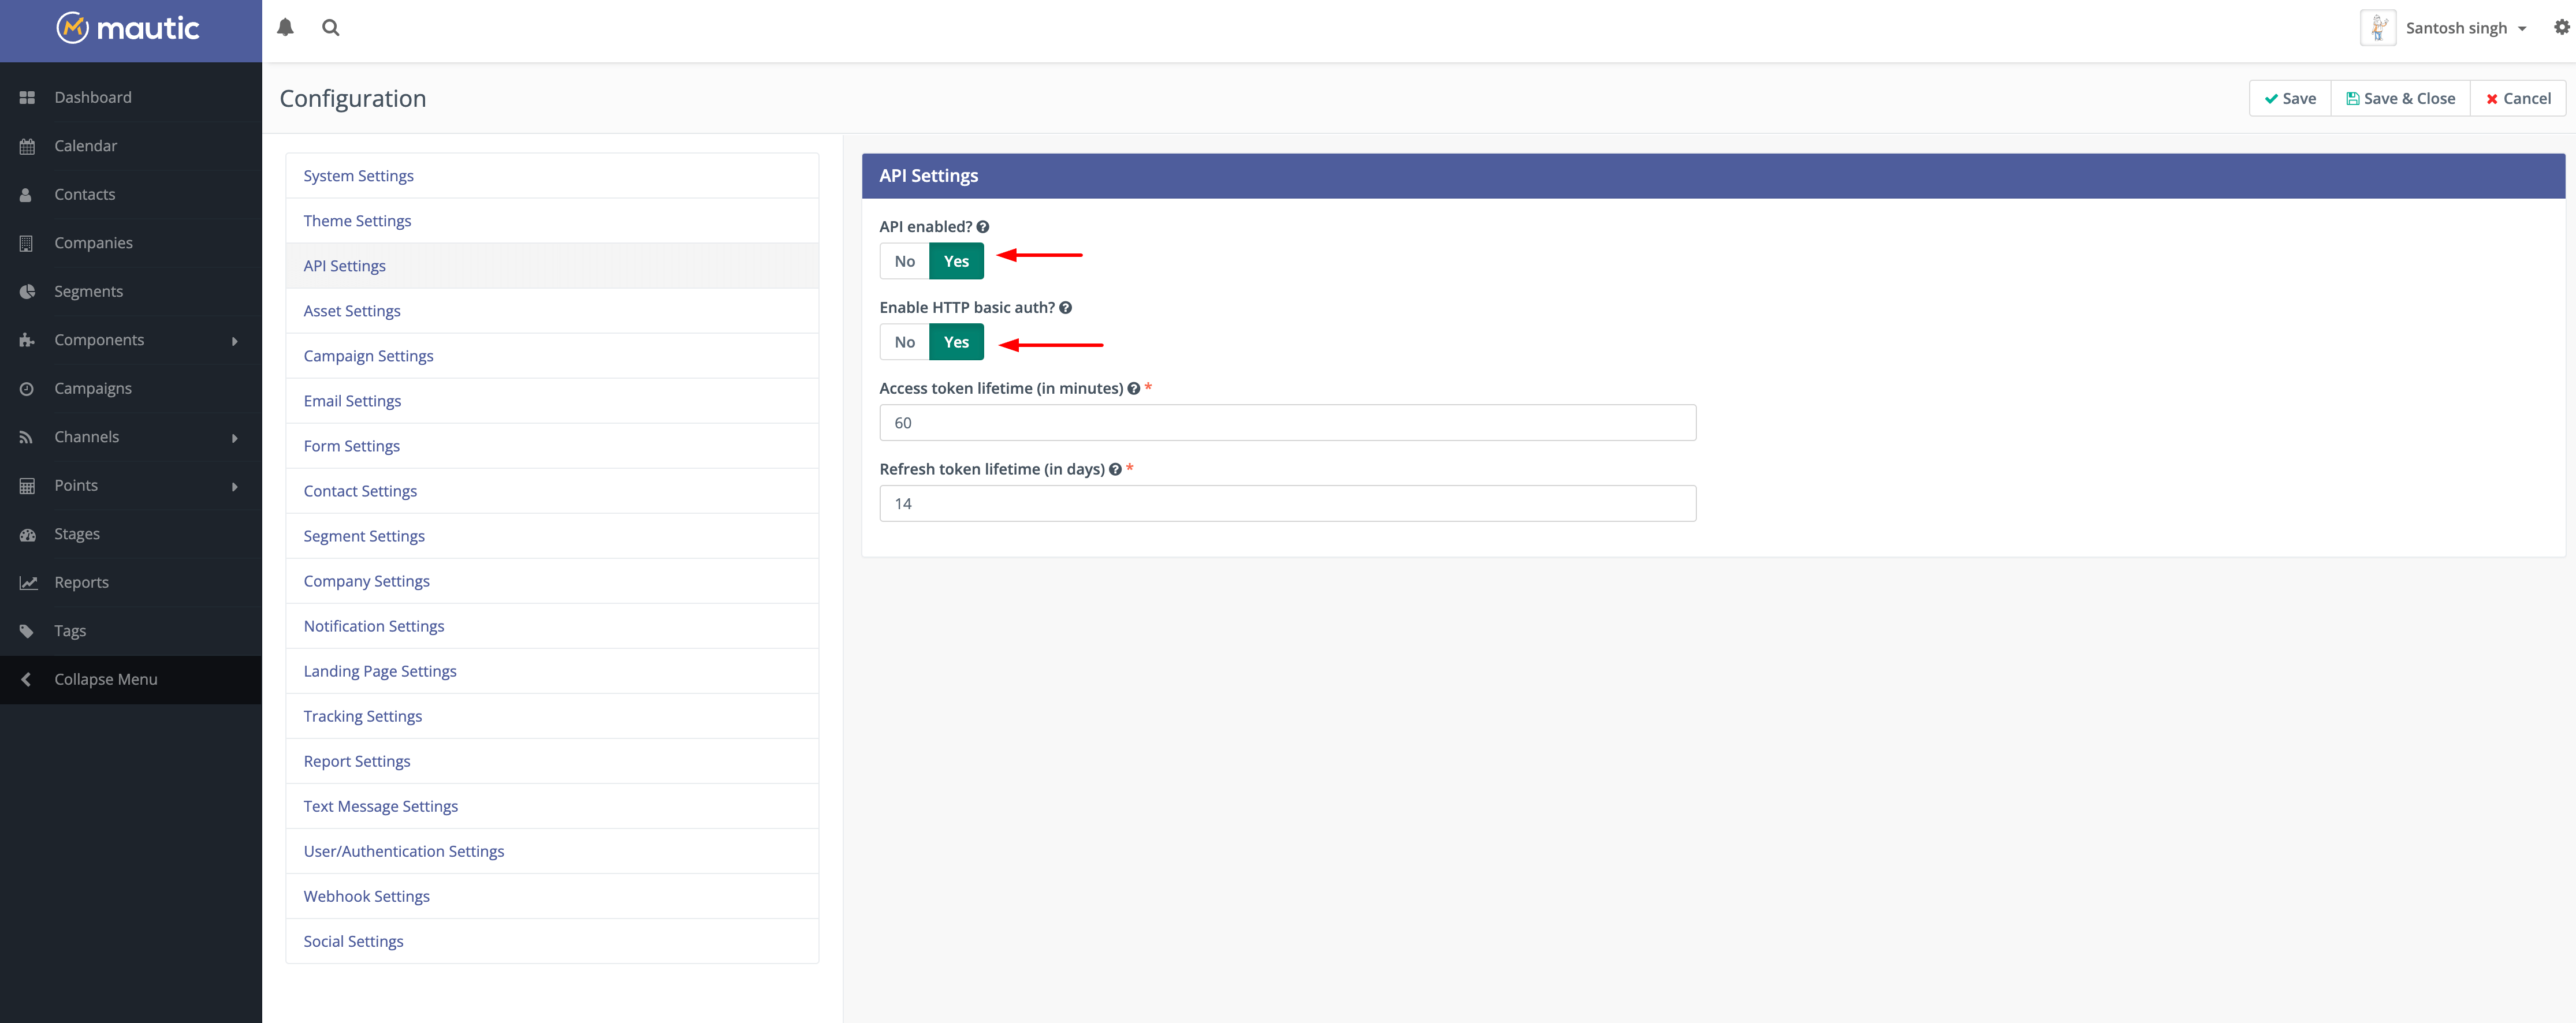
In order to create API Credentials, now you need to visit https://yourdomain.com/mautic/s/credentials/new
and under redirect URI, you need to put https://yourdomain.com/wp-admin/admin.php?page=arhive-wc-autoresponder-mautic-settings if your ARHive WooCommerce is installed at https://yourdomain.com.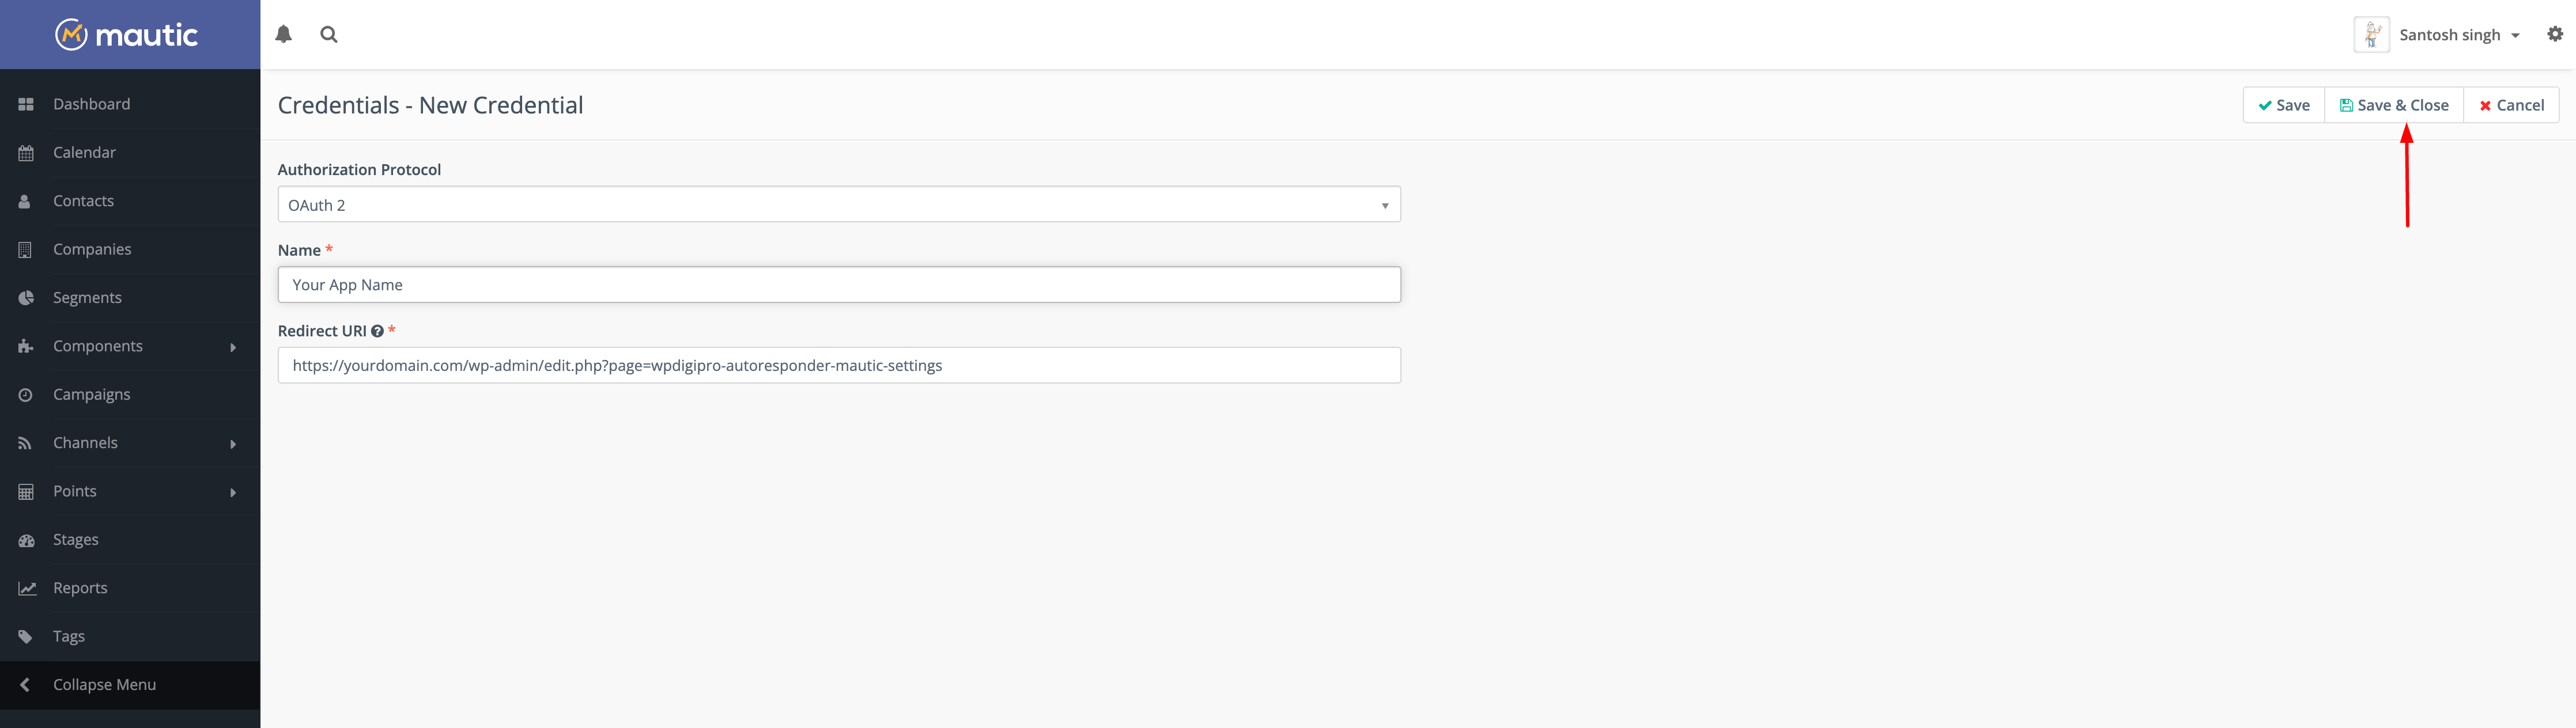 After clicking on "Save and Close" button, you will get your "Public Key" and "Secret Key" on the next screen as shown below:
Sendinblue
If you don't have an account, you can create your Sendinblue account.
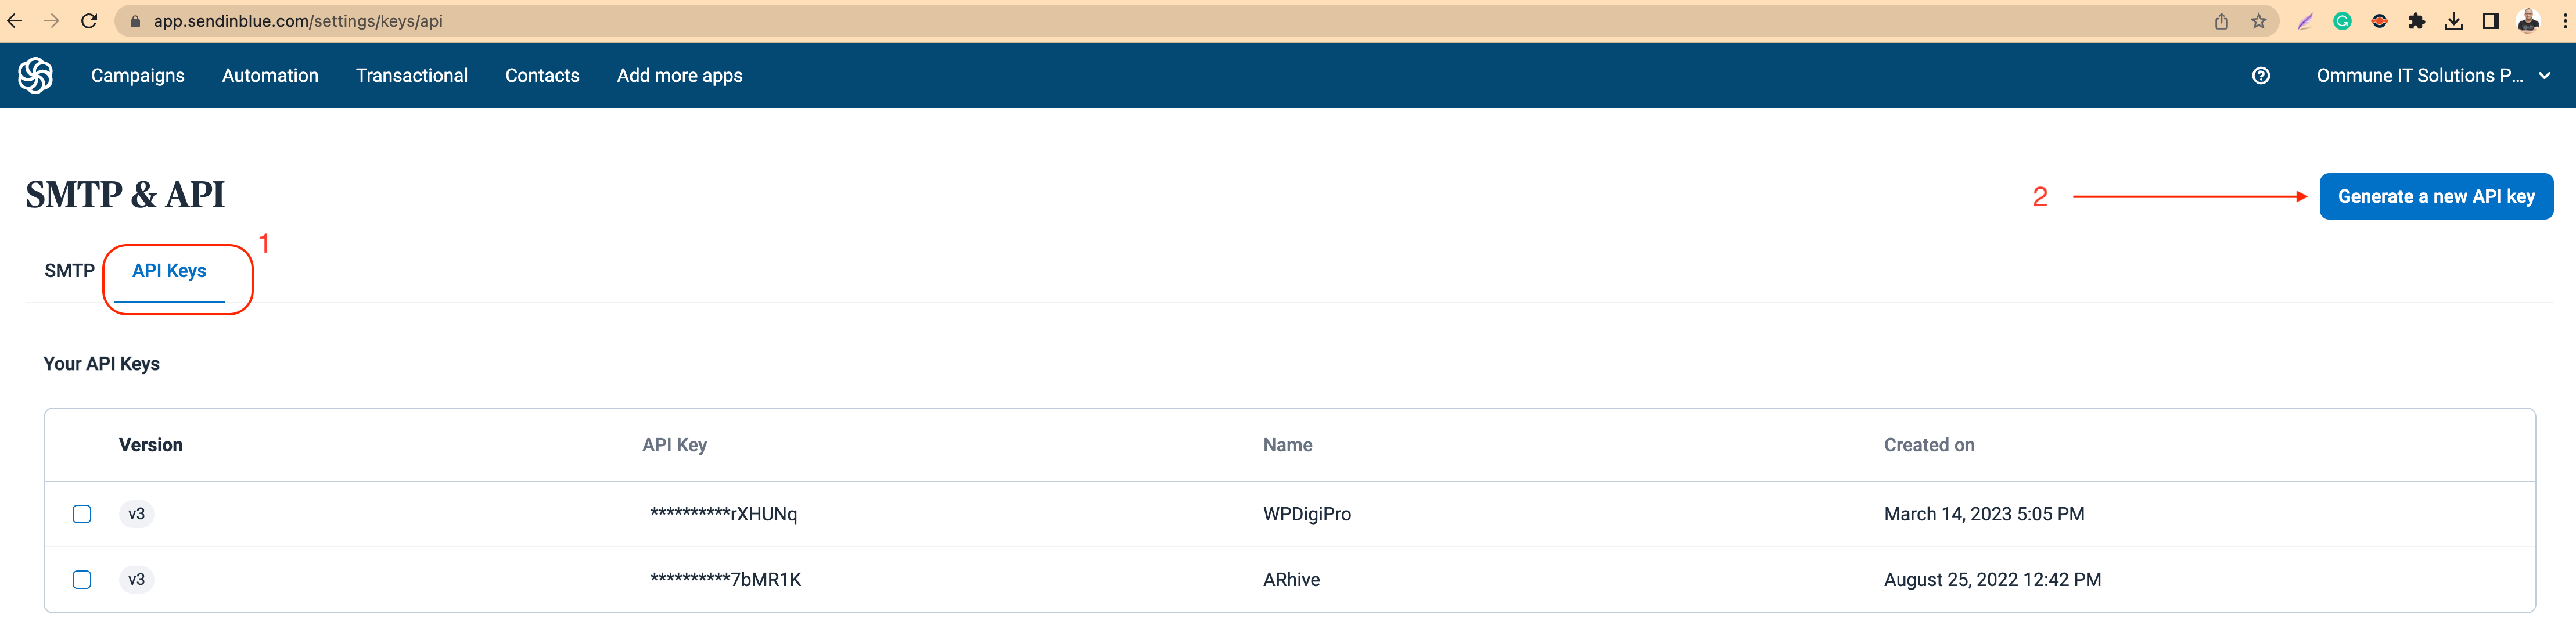
If you already have an account, you can visit https://app.sendinblue.com/settings/keys/api page to access/generate a new API Key.
OR
To get your API Key Check down arrow icon in extreme right hand side under your company name as shown below.
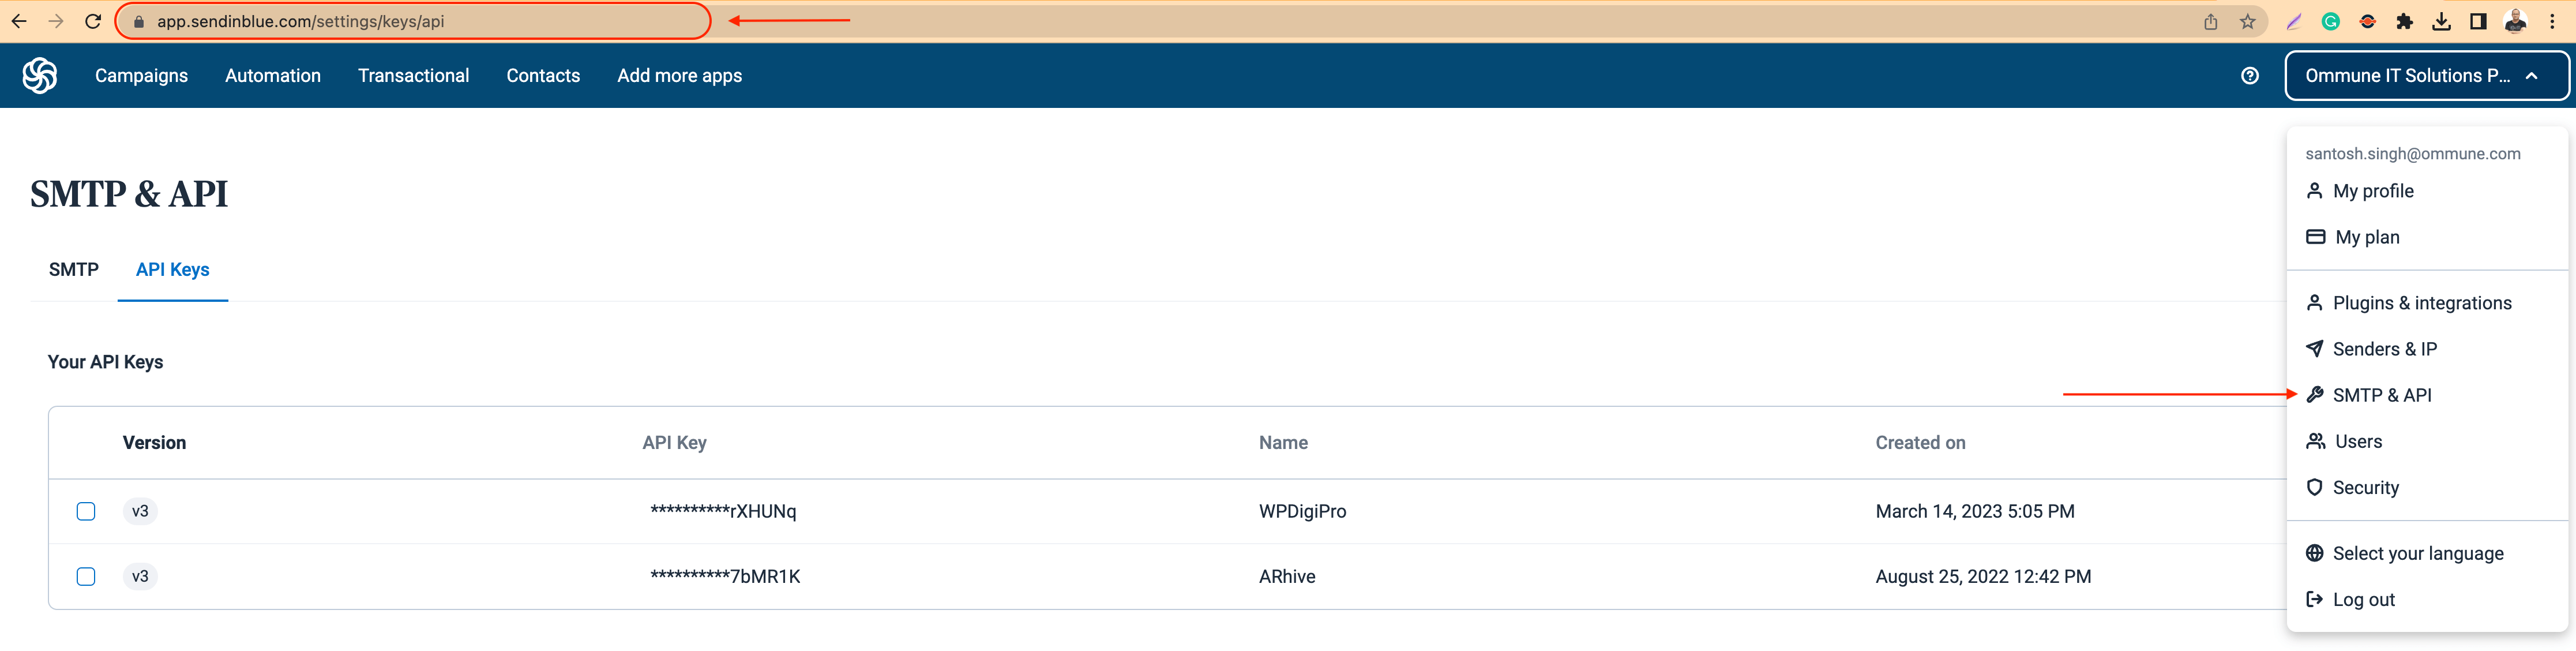 Then click on "API Keys" tab and then click on "Generate a new API Key" button as shown below: